Learning Technologies

Learning Technologies

News

ePortfolio – Navbar

March 19, 2018

Adding ePortfolio to you Navbar

  • Enter your course, Click “Edit Course”

Adding ePortfolio to you Navbar;Enter your course, Click "Edit Course"

  • Click “Navigation & Themes”

;Click "Navigation & Themes"

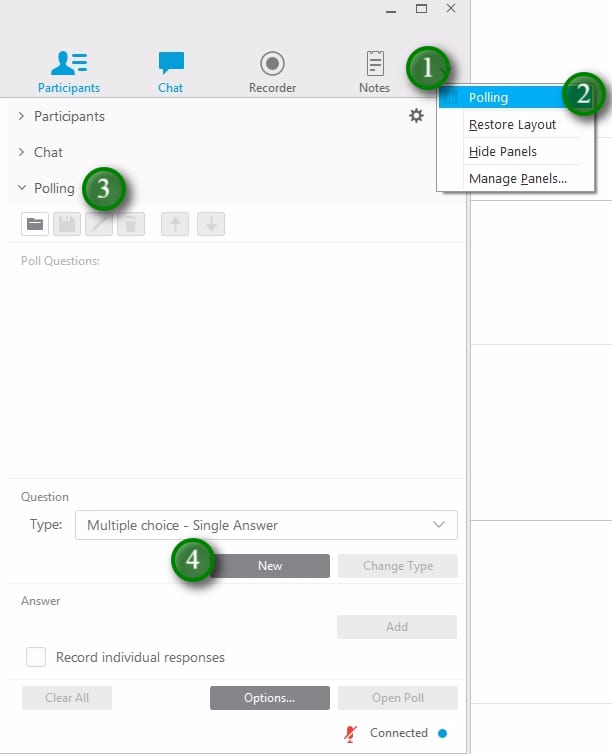
  •  Click the dropdown menu connected to the default Nav bar (1), click “Copy” (2)

;Click the dropdown menu connected to the default Nav bar (1), click "Copy" (2)

  •  Click the name of the new navbar copy to edit

;Click the name of the new navbar copy to edit

  •  Rename your Navbar (1), Click “Add Links” (2)

;Rename your Navbar (1), Click "Add Links" (2)

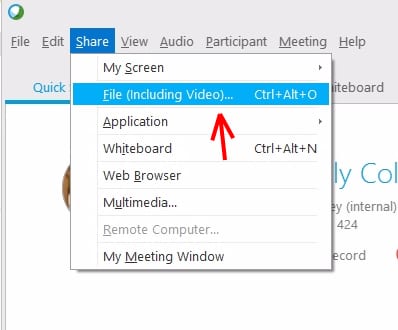
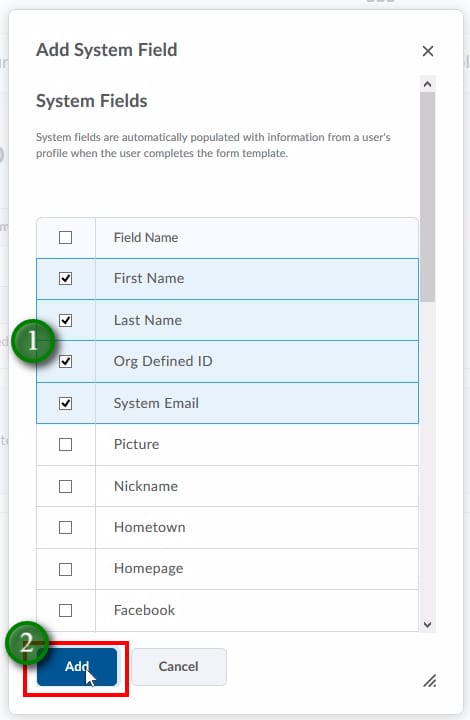
  •  Select the Navbar items you wish to add (1), in this case, “ePortfolio” and click “Add” (2)

;Select the Navbar items you wish to add (1), in this case "ePortfolio" and click "Add" (2)

  •  You are able to move the new link by clicking and dragging it. (1)
  • When done, click “Save and Close” (2)

;You are able to move the new link by clicking and dragging it. (1)
 When done, click "Save and Close" (2)

  •  Click the “Active Navbar” dropdown and select your new Navbar, (1) click “Apply” (2)

;Click the "Active Navbar" dropdown and seelct your new Navbar, (1) click "Apply" (2)

ePortfolio – Creating and Uploading Files as Artifacts

March 19, 2018

Artifacts in ePortfolio

There are several different types of files that you can upload to your presentation.

Artifacts used in ePortfolios are digital evidence of your learning, experience, achievements and goals. They are the building blocks of everything you do within the ePortfolio tool. An artifact can be almost any kind of file.

The artifacts you collect should have a purpose in demonstrating a skill or competency. You should collect a wide range of artifacts so you have many options to choose from when you build a presentation. Examples of artifacts you can include are:

  • Writing
    • Papers, projects, and writing samples
    • Journal/blog entries
    • Word, PDF, etc.
  • Projects, Assignments
    • Group projects
    • Examples of work from the class
    • Video and audio clips
    • Photographs, images, artwork
  • Work experience
    • Co-op and work experience
    • Community and service learning
    • Examples of Prior Learning
  • Other
    • Academic awards and honors
    • Grades
    • memberships in professional organizations
    • Certifications, WHMIS etc.

Uploading Artifacts

Video

Adding Files from your Computer as Artifacts

  • Click “Add Files”

;Click "Add Files"

  •  Click “Upload” or drag and drop your file

;Click "Upload" or drag and drop your file

  •  After uploading your file you can “Add tags” (1), and when done click “Add to Portfolio” (2)

;After uploading your file you can "Add tags" (1), and when done click "Add to Portfolio" (2)

Adding Assessments etc. as Artifacts in ePortfolio

You are able to add course content as reflections as well as add feedback, grades, assessments etc. as artifacts.

  • Find what you would like to add.
  • In this example, “Assessments”(1), “Dropbox”(2)

Adding Assessments etc. as Artifacts in ePortfolio;You are able to add course content as reflections as well as feedback, assessments etc. as artifacts. Find what you would like to add. In this example, "Assessments"(1), "Dropbox"(2)

  •  Click “View” to view the feedback on the assessment

;Click "View" to view the feedback on the assessment

  •  Click “Add to ePortfolio”

;Click "Add to ePortfolio"

  •  Give your Artifact a name (1), add a description and tags if you wish and click “Add” (2) when done.

;Give your Artifact a name (1), add a description and tags if you wish and click "Add" (2) when done.

ePortfolio – Tagging Artifacts

March 19, 2018

Tags

Tags are words you associate with your artifacts or items to make them easier to find within your ePortfolio.

You can search for items with specific tags. When searching for or adding tags, other users tags are shown for easy searching. For example, searching for or utilizing a tag named Creative will show the number of times it has been used as a tag.

  • To make a multiple-word tag, place double quotes around the entire phrase. For example typing “winter project” makes the two words a single tag.
  • To make a private tag that only you can see, type an @ symbol in front of the tag. For example typing @draft adds a private @draft tag to an item that other users will not see when you share the item with them.
  • To make a private multiple-word tag, put the at symbol before the quotation marks, for example: @”rough draft”.
  • To add tags to an existing artifact first click “edit” from its drop-down menu:
    Edit artifact menu item
  • Enter your tags and hit “Add Tag”:Add tags field

Tips for Teaching Online Using WebEx

March 19, 2018

1. Prepare

  • Have a detailed lesson plan.
  • Keep lessons short and on topic.
  • Have all PowerPoints and files pre-loaded into WebEx.
    ;
  • Load files into LEARN so students can prepare for the class.
  • Prepare WebEx Poll questions and discussion topics.
  • Ensure you follow the technical requirements.
  • Do a practice online session with your students before a formal class.

2. Engage Your Audience

  • Use your webcam to show your face.
    ;
  • Choose when to allow students access to use their microphone or webcam and allow students to share their screens.;
  • Pay attention to when students “raise their hand”, say their name, and address them in chat or using a microphone.;
  • Use polling and interactive whiteboards.;

3. Multitask

  • Be aware of the chat and students raising their hands.
  • Mute and un-mute students appropriately.;


4. Have a Backup Plan

Let’s face it, sometimes technology fails. It’s safest to always have a backup plan for online classes.

  • Record the session for students that may miss it for technical reasons.;
  • Post all materials, whiteboards, images, files, etc. in LEARN after the session.

For more detailed information on teaching online, click here to download the eLearning Guild’s Handbook on Synchronous Learning (PDF).

Share an ePortfolio within LEARN or outside of the organization

March 19, 2018

Share an ePortfolio within LEARN or outside of the organization

  • Access your ePortfolio and click to view “My Items”

Sharing an Artifact or Presentation;Access your ePortfolio and click to view "My Items"

  • Click the menu button (1) for the item you wish to share and then click “Share” (2)

;Click the menu button (1) for the item you wish to share and then click "Share" (2)

  • Click “Add Users and Groups” (1) to share this artifact with your instructor or classmates.
  • “Allow public viewing of presentation” (2) will only be available for Presentations. To share this way you will add the checkmark to that box and distribute the “Share URL” with those you wish to view the presentation. Removing the checkmark will remove the ability to view the presentation from the URL.
  • “Show Visibility Options” (3) will allow you to set a start and end date for the visibility of your presentation.

;Click "Add Users and Groups" (1) to share this artifact with your instructor or classmates. "Allow public viewing of presentation" (2) will only be available for Presentations. To share this way you will add the checkmark to that box and distribute the "Share URL" with those you wish to view the presentation. Removing the checkmark will remove the ability to view the presentation from the URL. "Show Visibility Options" (3) will allow you to set a start and end date for the visibility of your presentation.

  • After clicking “Add Users and Groups” and selecting users to share your artifact with you will have the ability to “Assign Permissions” to control how the users can interact with your artifact.

;After clicking "Add Users and Groups" and selecting users to share your artifact with you will have the ability to "Assign Permissions" to controll how the users can interact with your artifact.

Video

ePortfolio – Presentation

March 18, 2018

Creating a Presentation

  • Access your ePortfolio and click “New Presentation”

Creating a Presentation;Access you ePortfolio and click "New Presentation"

  • Give your Presentation a Name, add a description and any tags you would like, click Save.
  • Click “Content/Layout”

;Give your Presentation a Name, add a description and any tags you would like, click Save. Click "Content/Layout"

  • Select any optional navigation or layout settings by clicking “Edit Presentation Navigation”(1), or “Edit Page Layout”(2).
  • To create a new page click the “New Page” icon (3)

;Select any optional navigation or layout settings by clicking "Edit Presentation Navigation"(1), or "Edit Page Layout"(2). To create a new page click the "New Page" icon (3)

  • Give your new page a “Page Name” (1), apply any settings (2), and “Save” (3)

;Give your new page a "Page Name" (1), apply any settings (2), and "Save" (3)

  • To re-order your pages click the “Reorder pages” button

;To re-order your pages click the "Reorder pages" button

  • To add content to your Presentation click the page you wish to add to (1), and then “Add Component” (2)

;To add content to your Presentation click the page you wish to add to (1), and then "Add Component" (2)

  • Click the content you would like to add to your Presentation

;Click the content you would like to add to your Presentation

  • Clicking “Banner” (1) will allow you to rename your presentation’s banner, “Theme” (2) allows you to pick a new theme for your presentation.
  • You are able to preview (3) themes, and click “Select” (4) to choose a new theme.
  • At any point when building your Presentation you can click “View Presentation” (5) to see what it looks like.

Options for changing the Banner and Theme

Video

Submit an ePortfolio Artifact as a Dropbox Assignment

March 18, 2018

Submit an ePortfolio Artifact as a Dropbox Assignment

  • First, you will have had to add your artifact to your ePortfolio.
  • To submit it to the Dropbox click “Assessments” (1) and “Dropbox” (2).

Submitting an ePortfolio Artifact as a Dropbox Assignment;First you will have had to add your artifact to your ePortfolio. To submit it to the Dropbox click "Assessments" (1) and "Dropbox" (2).

  • Find the dropbox you wish to submit the artifact to and click it’s title.

;Find the dropbox you wish to submit the artifact to and click it's title.

  •  Click on “Add a File” button as you would submitting any file.

; Click on "Add a File" button as you would submitting any file.

  •  Click on “ePortfolio”

; Click on "ePortfolio"

  • Select the ePortfolio item you wish to submit (1) and then click “Select Item” (2)

;Select the ePortfolio item you wish to submit (1) and then click "Select Item" (2)

  • You will now see your artifact attached (1), you are able to add any comments (2) you wish, and when ready hit “Submit” (3).

;You will now see your artifact attached (1), you are able to add any comments (2) you wish, and when ready hit "Submit" (3). You will receive a confirmation page and email.

  • You will receive a confirmation page and email.

ePortfolio – Assessing Forms

March 16, 2018

Assessing a Completed ePortfolio Form

A student is able to submit their completed forms to an assignment Dropbox in LEARN.
To assess the student submission:

  • Click “Assessments,” and “Dropbox.”

Assessing a Completed Form;A student is able to submit there completed forms to an assignment Dropbox in LEARN. To assess, click "Assessments", and "Dropbox"

  •  Click on the Dropbox the student submitted their Form to.

;Click on the Dropbox the student submitted there Form to.

  •  From the list of student submissions, click on the Form (1) or “Evaluate” (2) to view and grade the form.

;From the list of student submissions, click on the Form (1) or "Evaluate" (2) to view and grade the form

  •  From the “Evaluate Submission” area you can click the name of the form to view for assessment.

;From the "Evaluate Submission" area you can click the name of the form to view for assessment.

  •  Depending on your web browser it may open in a new tab, or exit the “Evaluate Submission” screen. To view the completed form click “View.”

;Depending on your web browser it may open in a new tab, or exit the "Evaluate Submission" screen. To view the completed form click "View"

  •  After viewing the completed form, you may have to either close the browser tab or click the back button to return to the “Evaluate Submission” screen where you can add grades and comments for the student.

;After viewing the completed form you may have to either close the browser tab, or click the back button to return to the "Evaluate Submission" screen where you can add grades and comments for the student.

Creating forms for surveys, self-reflection, or self and peer evaluation through forms

March 15, 2018

Creating forms for surveys, self-reflection, or self and peer evaluation through forms

Forms are a powerful tool that will integrate with your course content and a users ePortfolio. Forms can be used for surveys, guided reflections, self-assessment, peer-evaluation and more. Forms are the only way for a student to fill out a rubric and completed forms can be easily submitted to a dropbox for instructor assessment.

Creating a Form

  • Click “Edit Course”

Creating a Form;Click "Edit Course"

  •  Click on “Forms”

; Click on "Forms" 

  •  Click on “New Form Template” button

; Click on "New Form Template" button 

  •  Name your Form Template (1), ad a Description if desired (2), and click “Save”
    (3)

;Name your Form Template (1), ad a Description if desired (2), and click "Save" (3)

  •  Click on “Add System Field” button to choose what user data you would like to collect when the form is filled out

; Click on "Add System Field" button to choose what user data you would like to collect when the form is filled out

  •  Select what data you would like to include in your form (1) and click “Add” (2)

;Select what data you would like to include in your form (1) and click "Add" (2)

  •  Click “Add Custom Field”

;Click "Add Custom Field"

  •  Give the Field a Name (1), decide if it’s required or not (2), and select what Data Type you would like (3)

;Give the Field a Name (1), deside if it's required or not (2), and select what Data Type you would like (3)

  •  In this example “Drop-down List” was selected as the Data Type. Fill in any required information (1), decide on any optional settings (2), and click “Save” (3)

;In this example "Drop-down List" was selected as the Data Type. Fill in any required information (1), deside on any optional settings (2), and click "Save" (3)

  •  Click “Add Custom Field” to continue adding fields.

;Click "Add Custom Field" to continue adding fields. 

  •  Fill in the required fields (1), select your Data Type (2),  click on “Which data type should I choose?” (3) if you need an explanation on data types, fill in any optional fields (4), click “Save” (5) when done.

;Fill in the required fileds (1), select your Data Type (2),  click on "Which data type should I choose?" (3) if you need an explanation on data types, fill in any optional fields (4), click "Save" (5) when done.

Using Forms Allows for Self and Peer Evaluation

Forms will allow for self and peer evaluation through the use of rubrics. Rubrics will need to be published in the course shell and the “Advanced Availability”, “Allow new associations in ePortfolio” option will need to be selected.

Selecting e-portfolio option in advanced availability

  • Click “Add Custom Field”

Using Forms Allows for Self and Peer Evaluation;Click "Add Custom Field"

  •  Select “Rubric Evaluation” as your custom Data Type

;Select "Rubric Evaluation" as your custom Data Type

  •  Give your Field a name (1),  Click on “Select Rubric” (2) button (Note: You will have had to build the Rubric into LEARN already and have it published), click “Save” (3)

;Give your Field a name (1),  Click on "Select Rubric" (2) button (Note: You will have had to build the Rubric into LEARN already and have it published), click "Save" (3)

Making a Form Available to Students

  • Click on “Course Content”, and “Content”.

Making a Form Available to Students;Click on "Course Content", and "Content".

  •  Click or create the Module you would like the Form to be added to (1), click on “Add Existing Activities” menu (2), click on “Form Templates” (3)

;Click or create the Module you would like the Form to be added to (1), click on "Add Existing Activities" menu (2), click on "Form Templates" (3) 

  •  Click on the Form you wish to add

;Click on the Form you wish to add

  •  The Form is now added to the content

;The Form is now added to the content

ePortfolio – Reflections

March 15, 2018

Creating a Reflection

  • Access your ePortfolio
  • Click “My Items”

;Click "My Items"

  • Click Add (1) and then Reflections (2)

;Click Add (1) and then Reflections (2)

  • Create a Title (1), the Reflection its self (2), any Tags you want to be associated (3), and then click “Save and Close” (4)

;Create a Title (1), the Reflection it's self (2), any Tags you want associated (3), and then click "Save and Close" (4)

  • Once done your Reflection can be treated as any other Artifact within your ePortfolio

Reflecting on Course Content

  • Access the course content you would like to reflect on within LEARN
  • Scroll to the bottom of the page of content and click “Reflect in ePortfolio”

;Scroll to the bottom of the page of content and click "Reflect in ePortfolio"

  • You will receive the same Reflection screen as above, but Tags related to the course content will be automatically applied. You can remove unwanted tags by clicking the “x” at the end of the tag name.
  • Fill in the Title, any Tags you would like to include, the Reflection, and click “Add”.

Click on "Add" button;You will receive the same Reflection screen as above, but Tags related to the course content will be automatically applied. You can remove unwanted tags by clicking the "x" at the end of the tag name. Fill in the Title, any Tags you would like to include, the Reflection, and click "Add".

  • You can now view your reflection in ePortfolio (1), or click “Close” (2) to return to your course content.

;You can now view your reflection in ePortfolio (1), or click "Close" (2) to return to your course content.

RRC Polytech campuses are located on the lands of Anishinaabe, Ininiwak, Anishininew, Dakota, and Dené, and the National Homeland of the Red River Métis.

We recognize and honour Treaty 3 Territory Shoal Lake 40 First Nation, the source of Winnipeg’s clean drinking water. In addition, we acknowledge Treaty Territories which provide us with access to electricity we use in both our personal and professional lives.

Learn more ›