Learning Technologies

Learning Technologies

Students

Grades – Learner

July 26, 2018

View grades and class progress

To view grades

Use the Grades tool to check your grades on assignments and tests. You can see your individual grades and comments, as well as class averages and feedback. You can also view your final grade and the grade formula used to evaluate you once your instructor releases your grades.

Grades

How do I know when my grades are available?

You can sign up to receive immediate text or email notifications when a grade item is released or updated.

Note: You must set up a contact method before subscribing to notifications.

  1. From your personal menu on the minibar, click Notifications.
  2. Select if you want to receive Email or SMS notifications for the option Grades – grade item released or Grades – grade item updated.
  3. Click Save.

View your grades

Use the Grades tool on the navbar to check your grades on assignments and tests. You can see your individual grades, as well as the grade formula used to evaluate you. Depending on how your grades are set up, you might be able to view comments and overall class performance statistics as well.

Note: Bonus grade items are displayed without the grade formula because they are added to the final grade after other calculations and may not adhere to the established grade scheme. Therefore you can only view the numeric value and possibly the weight of a bonus grade.

Viewing Grade Item Exemptions

Learners can view the grade item exemptions in several locations in Brightspace Learning Environment. On the My Grades page, exemptions are listed in the Grade column. Points and weights that appear on the Grades page are controlled by instructors; however, the Grade column always shows exempted grade items.

How rubrics relate to your grade

Rubrics are used to assess your achievement on course activities (assignments, discussions, and quizzes), based on predefined achievement levels and assessment criteria. They help ensure that activities are evaluated fairly and consistently, and can enable you to view the grading criteria in advance of submitting activities.

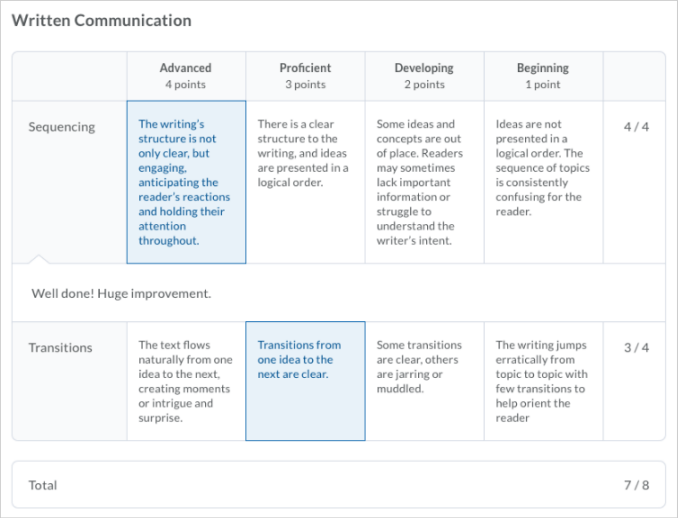
Figure: Graded rubric feedback for an assignment

Rubrics are associated directly with activities, so you may have the option you to view the criteria used to assess your activity before you submit your work. However, in some cases, your instructor may choose to hide a rubric for an activity until it is graded and feedback is published. This may be done to prevent learners from using rubrics as answer keys for activities. For example, your instructor may describe assessment expectations in assignment instructions, hiding the associated preview rubric. Once the assignment is graded, your instructor releases the graded rubric as part of your assessment details.

The graded rubric for the activity includes achieved criteria, personalized feedback, and score. In some cases, the activity includes a link to the graded rubric. For example, a discussion shows instructor feedback, score, and a link to the graded rubric.

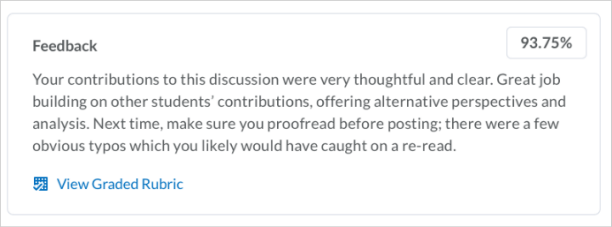
Figure: A discussion showing instructor feedback, score, and link to the graded rubric

When you are notified that your grade for an activity is released or updated, you can view the feedback from the respective tool. For example, to view assignment feedback, go to the Assignments tool.

Videos:

Keeping Up-to-date with LEARN Email or Text Notifications

December 14, 2017

You are able to set up email and mobile notifications in LEARN so that you can keep as up-to-date as possible on all activities from within your courses.

As an instructor, having students set up notifications will ensure they receive News updates, or other notifications as soon as possible. This is especially useful for communicating cancellations or changes due to weather or other circumstances.

    • From within LEARN, click your username and then notifications

Accessing LEARN's notifications

  • You are then able to enable email and/or mobile notifications, and then define exactly what you will receive notifications on and from which courses.
  • Once done, click “Save”
Video:

Taking a Quiz that Requires the Respondus LockDown Browser

October 16, 2017

The Respondus LockDown Browser (LDB) is an interface used to increase security during an online assessment. The LDB will “Lock” the computer to prevent files or websites from being available during the duration of your assessment.

An exam/test/quiz that requires the LDB will indicate this in the name of the assessment including the text “- Requires Respondus LockDown Browser” in its title.
example of LDB enabled quiz name

Accessing your Quiz with LDB

  1. Click the name of the assessment as you would any other. You will see that the Quiz Requirements include a link to download and install the LDB.Options to install or launch the LDB
    1. If you already have the LDB installed on your computer, simply click “Launch LockDown Browser” and skip to step #5.
    2. If you do not have it installed, click “Download and Install the latest version of LockDown Browser”
    3. If you are taking your assessment in a computer lab the LDB should have been installed prior to your assessment taking place.
  2. A new tab will open with information, a video, as well as instructions and a link to install the LDB. View whatever materials you require and click “Install Now”. The LDB installation screen
  3. Your computer will download an installation file for LDB.
    1. If you are using IE you may see a yellow prompt at the bottom of your screen asking you to save or run the installation file. Click “Run”. IE prompt to run the instalation
    2. If you are using an alternate browser to IE you may have to locate the downloaded file (usually in your downloads folder) and click to run that file.
    3. Various security prompts may come up during the installation. It’s important to review these and allow when appropriate.
  4. Once installed you will need to return to your quiz. You may have to close the installation tab in your browser by clicking the “x” on that tab. example of 2 browser tabs
  5. When you are ready to start your assessment click “Launch LockDown Browser”. It may take a few moments for the LDB to launch and open your quiz. Example of the Launch LDB button
    1. Note that some applications such as Outlook will need to be closed before launching the LDB.
    2. Your browser may prompt you to allow the launch of the LDB.IE security prompt
  6. When taking your quiz be sure to save each question as you go. In the event of computer problems or a power failure, you will be able to re-enter the quiz and pick up where you left off as long as you have been saving your questions and there is time still available on your quiz.
  7. Once you have submitted your quiz you will be prompted to close the LDB, the LDB will close and you will be returned the LEARN in your standard web browser.

Registering Your i>Clicker Remote in LEARN

September 4, 2015

Tagged in: LEARN, How to Videos

Description: This video shows how to register your i>Clicker in a LEARN course when enabled by the instructor.

Calendar

March 1, 2013

Manage course events

Use the Calendar tool to arrange and visualize course events in multiple views and enable integration of course content and your Calendar. You can use iCal to synchronize the Calendar tool to your personal calendars (such as Outlook and Google Calendar, as well as iPhone and Android).

Calendar interface overview


1) Use the calendar views area to toggle between different event display layouts. Use the Agenda view to group your course events by Date, Course, or Category – events display in chronological order, and all-day events display at the top of each grouped listing. Use the Day, Week, and Month views to group your events in daily, weekly, or monthly increments. Use the List view to filter your events by Assignments, Checklists, Discussions, Grades, Materials, Modules, Quizzes, and Surveys.

2) Use the calendar content area to navigate through your content. Navigation will vary depending on the view you select.

3) Use the calendar menu to select multiple calendars to display, change the color scheme associated with individual calendars, and add new calendars.

4) Use the mini calendar to navigate quickly to a specific day, week, or month.

5) Use the task pane to create, track, and maintain personal tasks.

Import a calendar from your computer

You can add new events and update existing events by importing them from an external iCal file into your Calendar.

  1. On the navbar, click  Calendar.
  2. From the calendar menu, click the course you want your events to be grouped under.
  3. Click Import Events.
  4. To search for the iCal file containing your events, on the Import Events page, click Browse. If you want to import the events into a specific group or section, in the Attendees drop-down list, select the group or section.
  5. Click Open > Import.

Change Calendar settings

  1. On the navbar, click  Calendar.
  2. Click  Settings.
  3. Make your changes.
  4. Click Save.

Subscribe to a calendar

Use iCal feeds to access your Calendar events outside of the learning tool. With iCal feeds, you can view your course events in external calendars such as Microsoft Outlook and Google Calendar, and on mobile devices such as iPhones, BlackBerry smartphones, and Android phones.

Subscribing to an iCal feed syncs your external calendar application or device with the Calendar tool, keeping you updated without logging in to LEARN (Brightspace Learning Environment). Refer to your device or application instructions for adding an iCal feed, as each application can have a different method for managing iCal feeds.

  1. On the navbar, click  Calendar.
  2. In the Calendar views area, click  Settings.
  3. Select the Enable Calendar Feeds check box.
  4. In the Calendar views area, click  Subscribe.
  5. From the drop-down list, select which calendar you want to subscribe to, or select All Calendars and Tasks, or Tasks Only.

Video:

Tagged in: LEARN, How to Videos


Discussions

March 1, 2013

Participate in discussions with other learners

The Discussions tool is a collaboration area to post, read and reply to threads on different topics, share thoughts about course materials, ask questions, share files, or work with your peers on assignments and homework.

Create a discussion thread

To create a discussion thread

  1. On the navbar, click Discussions.
  2. Click the topic where you want to create a thread.
  3. Click Start a New Thread.
  4. Enter a subject.
  5. Enter your post.
  6. Set any of the following posting options:
    • To keep the thread at the top of the list, select Pin Thread.
    • To post anonymously (if enabled), select Post as Anonymous.
    • To receive updates on the thread using your selected notification method, select Subscribe to this thread.
    • To attach a file, in the Attachments area, click Browse to locate the file that you want to attach.
    • To attach an audio recording, in the Attachments area, click Record Audio > Record. To make adjustments to your microphone selection and volume, click Flash Settings. To listen to your recording, click Play. To erase your recording, click Clear. If you have prerecorded audio and are using a supported browser, you can drag audio files onto the attachments upload target.
    • To attach a video recording, in the Attachments area, click Record Video > Allow > Record. When you finish recording, click Stop. To erase your recording, click Clear. To add the recording, click Add. If you have pre-recorded video and are using a supported browser, you can drag video files onto the attachments upload target.
    • To post your thread to more than one topic, click Post to other topics. Click Add Topics. Select the topics that you want your thread to appear in. To post in every topic simultaneously, select the Select All check box and then click Add Topics.
  1. Click Post. If the topic is moderated, your post does not appear until a moderator approves it.

Reply to a discussion thread

  1. On the navbar, click  Discussions.
  2. Locate the thread you want to reply to.
  3. Do either of the following:
    •  To reply to the main thread post, click Reply to Thread.
    •  To reply to a particular post inside the thread, or click  Reply.
  1. Enter your reply in the HTML Editor. To include the original post’s text in your reply, click the Add original post text link. (If this option is already enabled by your course administrator, this message will not display.)
  2. Set any of the following options:
    • To post anonymously (if enabled), select Post as Anonymous.
    • To receive updates on the thread using your selected notification method, select Subscribe to this thread.
    • To attach a file, in the Attachments area, click Browse to locate the file you want to attach.
    • To attach an audio recording, in the Attachments area, click Record Audio > Record. To make adjustments to your microphone selection and volume, click Flash Settings. To listen to your recording, click Play. To erase your recording, click Clear. If you have pre-recorded audio and are using a supported browser, you can drag audio files onto the attachments upload target.
    • To attach a video recording, in the Attachments area, click Record Video > Allow > Record. When you finish recording, click Stop. Click Clear to erase your recording or Add to add the recording. If you have pre-recorded video and are using a supported browser, you can drag video files onto the attachments upload target.
  1. Click Post.

Change discussion settings

  1. On the navbar, click  Discussions.
  2. On the Discussions List page, click  Settings.
  3. Do any of the following:
    • To show topics in the View Topic and View Thread pages, select the Always show the Discussions List pane check box.
    • To hide topics in the View Topic and View Thread pages, clear the Always show the Discussions List pane check box.
    • To automatically include the original post when replying, select the Reply Settings check box.
  1. Click Save.

Subscribe to a discussion

  1. On the navbar, click  Discussions.
  2. Do either of the following:
    • On the Discussions List page, from the context menu of the forum or topic you want to receive notifications of new posts for, click  Subscribe.
    • On the View Topics page, beside the thread you want to receive notifications for, click Subscribe.
  1. In the Customize Notifications pop-up window, select your Notification Method. If you do not have an email address set up in your user profile to receive notifications, in the Customize Notifications pop-up window, click the Add an email address in a new window link. Click the Enable email notifications link, then set your email preferences in the Email Settings pop-up window. Click Save.
  2. Click Subscribe.

Unsubscribe from notifications

  1. On the navbar, click  Discussions.
  2. Do either of the following:
    • From the context menu of the forum or topic you are subscribed to, click  Unsubscribe.
    • Beside a thread you are subscribed to, click  Subscribed.
  1. In the confirmation pop-up window, click Yes.

Video:

Tagged in: LEARN, How to Videos

Dropbox

March 1, 2013

Submit assignments

To submit assignments

  1. From the navbar, click  Assignments.
  2. On the Assignment Submission Folders page, click on the folder you want to submit to.
  3. Depending on the submission type your instructor has selected for the assignment, do one of the following:
  • Type your assignment directly in the Text Submission field. When you finish your written response, click Submit.
  • To browse for the file you want to submit, click Add a File. You can attach files from your local computer or storage device, a personal locker, a group locker, or Brightspace ePortfolio. Enter any comments you want to submit with the file. Click Submit.
  • You can select Record Audio to add feedback. When you finish a recording, click Add. Enter any comments you want to submit with the file. Click Submit.

Note:

Any rubrics with which submissions are evaluated are listed on the submission page so you can see how submissions are evaluated.

View feedback in Assignments

  1. From the navbar, click  Assignments.
  2. To view your grade, rubric assessment, and feedback comments, on the Assignment Submission Folders page, click View Feedback in the Feedback column beside the folder containing your submission.
  3. To view any formative feedback that your instructor left in GradeMark, click View Inline Feedback.
  4. To download feedback attachments, click Download All Files.
  5. When you are finished viewing feedback, click Done.

Understanding due dates and end dates

A due date is the submission deadline of an assignment in your course. This date is specific to assignments only.

End dates are attached to Assignment submission folders. The end date is the final date an Assignments submission folder is available for you to submit assignments to, regardless of the due date. Once the end date of the folder is past, you are no longer able to submit an assignment, no matter what the assignment’s due date is.

Videos:


Tagged in: LEARN, How to Videos

Description: The Dropbox tool is where you can submit your assignments to your instructor. Submissions are date and time stamped.

Getting Started

March 1, 2013

Tagged in: LEARN, How to Videos

Description: This is a guide to logging in and getting started in Learn.

Locker

March 1, 2013

Upload, store, and share files

Use the Locker tool to upload and store files in LEARN (Brightspace Learning Environment). Locker enables you to upload files from your PC, or to create new HTML files.

Your personal locker area is not course-specific. You can access the locker from anywhere in LEARN and store all of your files together.

Group lockers are restricted locker areas where members of a group can share files. Any group member can modify files posted in group locker areas.

Group lockers have the same options as regular lockers with the following exceptions:

  • The option to make locker files public in not available.
  • There is an option to Email Group Members.
  • There is a Modified By column that shows the last person to work on a file.

Find other learner’s shared locker files

  1. On the navbar of a course, click  Classlist.
  2. From the context menu of the user whose shared locker files you want to view, click  View shared locker files.
  3. Click the file name you want to open, or specify a file type in the Files of Type drop-down list.

Video:

Tagged in: LEARN, How to Videos

Description: The Locker is an electronic storage area for you to store files. You can upload and download files from your home computer and use them in Learn or transfer them from one computer to another. Only the owner of the locker can view its contents. Shared lockers can be set up for group assignments.

RRC Polytech campuses are located on the lands of Anishinaabe, Ininiwak, Anishininew, Dakota, and Dené, and the National Homeland of the Red River Métis.

We recognize and honour Treaty 3 Territory Shoal Lake 40 First Nation, the source of Winnipeg’s clean drinking water. In addition, we acknowledge Treaty Territories which provide us with access to electricity we use in both our personal and professional lives.

Learn more ›