Learning Technologies

Learning Technologies

News

LEARN Discussions

March 1, 2013

Tagged in: LEARN, How to Videos

Description:

The Discussions tool can be used for online discussions between you and your students or between groups of students. After setting up a discussion Forum (major categories), you can create individual topics within the forum for discussion. Students can post messages in a ‘threaded’ discussion. Students can also attach documents & images to their messages. You can set Discussions up to be marked.

LEARN Intelligent Agents

March 1, 2013

Tagged in: LEARN, How to Videos

Description:

The Intelligent Agents tool monitors your course to find activity that matches criteria that you set. You can use intelligent agents to do things like email students with grades below a certain level, check for students that have not logged in recently, or perform actions when students view certain pieces of content.

LEARN Quizzes

March 1, 2013

Tagged in: LEARN, How to Videos

Description:

The Quizzes tool allows you to create a variety of assessments for your students. While labeled ‘Quizzes’, this tool can be used for exams, surveys, and/or homework assignments. The Quizzes tool can be used to create the following types of questions: multiple-choice, true/false, arithmetic (including specifying ranges of numbers with significant figures), fill-in-the-blank, multi-select, matching, ordering, and long and short answers. Many of these questions can be graded automatically and then automatically entered into the Grades tool. Quizzes can be released conditionally based on date and time

LEARN Quizzes (Advanced)

March 1, 2013

Tagged in: LEARN, How to Videos

Description:

More about advanced settings in the Quiz tool

LEARN Release Conditions

March 1, 2013

Tagged in: LEARN, How to Videos

Description:

Release Conditions are used to define conditions that need to be satisfied in order to grant students access to a piece of content. “Release” means “visible or accessible to students.” The most commonly used release conditions are date and time. Learn also allows instructors to define other types of conditions for release of material to students. It can be used to define the order in which a student accesses course materials. These defined orders are sometimes referred to as “learning paths.”

Calendar

March 1, 2013

Manage course events

Use the Calendar tool to arrange and visualize course events in multiple views and enable integration of course content and your Calendar. You can use iCal to synchronize the Calendar tool to your personal calendars (such as Outlook and Google Calendar, as well as iPhone and Android).

Calendar interface overview


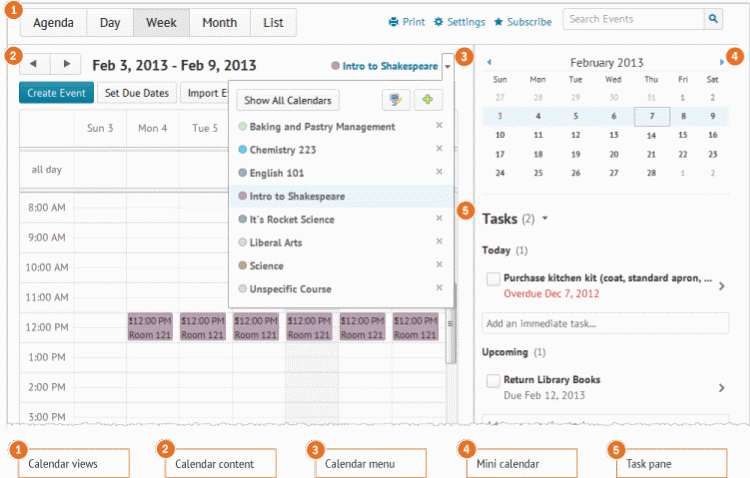
1) Use the calendar views area to toggle between different event display layouts. Use the Agenda view to group your course events by Date, Course, or Category – events display in chronological order, and all-day events display at the top of each grouped listing. Use the Day, Week, and Month views to group your events in daily, weekly, or monthly increments. Use the List view to filter your events by Assignments, Checklists, Discussions, Grades, Materials, Modules, Quizzes, and Surveys.

2) Use the calendar content area to navigate through your content. Navigation will vary depending on the view you select.

3) Use the calendar menu to select multiple calendars to display, change the color scheme associated with individual calendars, and add new calendars.

4) Use the mini calendar to navigate quickly to a specific day, week, or month.

5) Use the task pane to create, track, and maintain personal tasks.

Import a calendar from your computer

You can add new events and update existing events by importing them from an external iCal file into your Calendar.

  1. On the navbar, click  Calendar.
  2. From the calendar menu, click the course you want your events to be grouped under.
  3. Click Import Events.
  4. To search for the iCal file containing your events, on the Import Events page, click Browse. If you want to import the events into a specific group or section, in the Attendees drop-down list, select the group or section.
  5. Click Open > Import.

Change Calendar settings

  1. On the navbar, click  Calendar.
  2. Click  Settings.
  3. Make your changes.
  4. Click Save.

Subscribe to a calendar

Use iCal feeds to access your Calendar events outside of the learning tool. With iCal feeds, you can view your course events in external calendars such as Microsoft Outlook and Google Calendar, and on mobile devices such as iPhones, BlackBerry smartphones, and Android phones.

Subscribing to an iCal feed syncs your external calendar application or device with the Calendar tool, keeping you updated without logging in to LEARN (Brightspace Learning Environment). Refer to your device or application instructions for adding an iCal feed, as each application can have a different method for managing iCal feeds.

  1. On the navbar, click  Calendar.
  2. In the Calendar views area, click  Settings.
  3. Select the Enable Calendar Feeds check box.
  4. In the Calendar views area, click  Subscribe.
  5. From the drop-down list, select which calendar you want to subscribe to, or select All Calendars and Tasks, or Tasks Only.

Video:

Tagged in: LEARN, How to Videos


Discussions

March 1, 2013

Participate in discussions with other learners

The Discussions tool is a collaboration area to post, read and reply to threads on different topics, share thoughts about course materials, ask questions, share files, or work with your peers on assignments and homework.

Create a discussion thread

To create a discussion thread

  1. On the navbar, click Discussions.
  2. Click the topic where you want to create a thread.
  3. Click Start a New Thread.
  4. Enter a subject.
  5. Enter your post.
  6. Set any of the following posting options:
    • To keep the thread at the top of the list, select Pin Thread.
    • To post anonymously (if enabled), select Post as Anonymous.
    • To receive updates on the thread using your selected notification method, select Subscribe to this thread.
    • To attach a file, in the Attachments area, click Browse to locate the file that you want to attach.
    • To attach an audio recording, in the Attachments area, click Record Audio > Record. To make adjustments to your microphone selection and volume, click Flash Settings. To listen to your recording, click Play. To erase your recording, click Clear. If you have prerecorded audio and are using a supported browser, you can drag audio files onto the attachments upload target.
    • To attach a video recording, in the Attachments area, click Record Video > Allow > Record. When you finish recording, click Stop. To erase your recording, click Clear. To add the recording, click Add. If you have pre-recorded video and are using a supported browser, you can drag video files onto the attachments upload target.
    • To post your thread to more than one topic, click Post to other topics. Click Add Topics. Select the topics that you want your thread to appear in. To post in every topic simultaneously, select the Select All check box and then click Add Topics.
  1. Click Post. If the topic is moderated, your post does not appear until a moderator approves it.

Reply to a discussion thread

  1. On the navbar, click  Discussions.
  2. Locate the thread you want to reply to.
  3. Do either of the following:
    •  To reply to the main thread post, click Reply to Thread.
    •  To reply to a particular post inside the thread, or click  Reply.
  1. Enter your reply in the HTML Editor. To include the original post’s text in your reply, click the Add original post text link. (If this option is already enabled by your course administrator, this message will not display.)
  2. Set any of the following options:
    • To post anonymously (if enabled), select Post as Anonymous.
    • To receive updates on the thread using your selected notification method, select Subscribe to this thread.
    • To attach a file, in the Attachments area, click Browse to locate the file you want to attach.
    • To attach an audio recording, in the Attachments area, click Record Audio > Record. To make adjustments to your microphone selection and volume, click Flash Settings. To listen to your recording, click Play. To erase your recording, click Clear. If you have pre-recorded audio and are using a supported browser, you can drag audio files onto the attachments upload target.
    • To attach a video recording, in the Attachments area, click Record Video > Allow > Record. When you finish recording, click Stop. Click Clear to erase your recording or Add to add the recording. If you have pre-recorded video and are using a supported browser, you can drag video files onto the attachments upload target.
  1. Click Post.

Change discussion settings

  1. On the navbar, click  Discussions.
  2. On the Discussions List page, click  Settings.
  3. Do any of the following:
    • To show topics in the View Topic and View Thread pages, select the Always show the Discussions List pane check box.
    • To hide topics in the View Topic and View Thread pages, clear the Always show the Discussions List pane check box.
    • To automatically include the original post when replying, select the Reply Settings check box.
  1. Click Save.

Subscribe to a discussion

  1. On the navbar, click  Discussions.
  2. Do either of the following:
    • On the Discussions List page, from the context menu of the forum or topic you want to receive notifications of new posts for, click  Subscribe.
    • On the View Topics page, beside the thread you want to receive notifications for, click Subscribe.
  1. In the Customize Notifications pop-up window, select your Notification Method. If you do not have an email address set up in your user profile to receive notifications, in the Customize Notifications pop-up window, click the Add an email address in a new window link. Click the Enable email notifications link, then set your email preferences in the Email Settings pop-up window. Click Save.
  2. Click Subscribe.

Unsubscribe from notifications

  1. On the navbar, click  Discussions.
  2. Do either of the following:
    • From the context menu of the forum or topic you are subscribed to, click  Unsubscribe.
    • Beside a thread you are subscribed to, click  Subscribed.
  1. In the confirmation pop-up window, click Yes.

Video:

Tagged in: LEARN, How to Videos

Dropbox

March 1, 2013

Submit assignments

To submit assignments

  1. From the navbar, click  Assignments.
  2. On the Assignment Submission Folders page, click on the folder you want to submit to.
  3. Depending on the submission type your instructor has selected for the assignment, do one of the following:
  • Type your assignment directly in the Text Submission field. When you finish your written response, click Submit.
  • To browse for the file you want to submit, click Add a File. You can attach files from your local computer or storage device, a personal locker, a group locker, or Brightspace ePortfolio. Enter any comments you want to submit with the file. Click Submit.
  • You can select Record Audio to add feedback. When you finish a recording, click Add. Enter any comments you want to submit with the file. Click Submit.

Note:

Any rubrics with which submissions are evaluated are listed on the submission page so you can see how submissions are evaluated.

View feedback in Assignments

  1. From the navbar, click  Assignments.
  2. To view your grade, rubric assessment, and feedback comments, on the Assignment Submission Folders page, click View Feedback in the Feedback column beside the folder containing your submission.
  3. To view any formative feedback that your instructor left in GradeMark, click View Inline Feedback.
  4. To download feedback attachments, click Download All Files.
  5. When you are finished viewing feedback, click Done.

Understanding due dates and end dates

A due date is the submission deadline of an assignment in your course. This date is specific to assignments only.

End dates are attached to Assignment submission folders. The end date is the final date an Assignments submission folder is available for you to submit assignments to, regardless of the due date. Once the end date of the folder is past, you are no longer able to submit an assignment, no matter what the assignment’s due date is.

Videos:


Tagged in: LEARN, How to Videos

Description: The Dropbox tool is where you can submit your assignments to your instructor. Submissions are date and time stamped.

RRC Polytech campuses are located on the lands of Anishinaabe, Ininiwak, Anishininew, Dakota, and Dené, and the National Homeland of the Red River Métis.

We recognize and honour Treaty 3 Territory Shoal Lake 40 First Nation, the source of Winnipeg’s clean drinking water. In addition, we acknowledge Treaty Territories which provide us with access to electricity we use in both our personal and professional lives.

Learn more ›