Learning Technologies

Learning Technologies

Staff

LEARN – Updating LEARN logo for Custom Nav bar

August 9, 2017

This video will show how to update the LEARN logo from a white low contrast version to the correct green LEARN logo. This will only effect courses with custom navbars that existed prior to the new daylight interface.

Respondus LockDown – new features and changes – late May 2017

May 30, 2017

LEARN is removing the “LockDown Browser” option from the “Restrictions” tab in the Quiz settings. Instead, the LDB (LockDown Browser) will now be configured either from the Quiz tool main menu (“LockDown Browser” tab) or by creating an external link to the LockDown Browser Dashboard. This change also brings a new feature which allows students the ability to launch the LDB from the quiz start area.

To configure a quiz to use the “LockDown Browser” follow these steps:

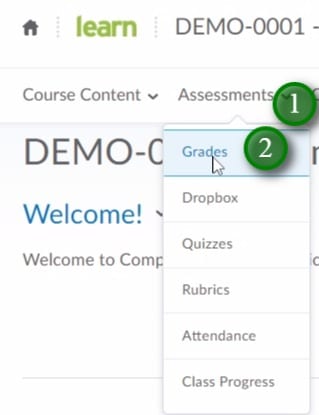
1. Under the “Assessments tab” select “Quizzes”

2. Click on the “LockDown Browser” tab

Picture1

3. Pick a quiz that requires the LockDown Browser, then select from the dropdown “Modify Settings”

Picture2

4. Choose the Require Respondus LockDown Browser for this exam” to unlock the LockDown Browser settings.

Picture3

5. You will also have the ability to pick more advanced settings.

6. When you are satisfied with your selections click “Save and Close” at the bottom right.

You have now setup the quiz to use the “LockDown Browser”.

As well, students now have the ability to launch the “LockDown Browser” from the start of a quiz:

1. When the student selects a quiz that is setup to use the “LockDown Browser” they will see the “Launch LockDown Browser” button at bottom of the quiz start page.

Picture4

2. The “Launch LockDown Browser” button will check to see if the user has the LockDownBrowser installed and will prompt them to install it if they haven’t already.

Contact LEARN Support if you have any questions regarding the changes. (learn@rrc.ca)

Video:

LEARN – Gradebook – The Final Adjusted Grade

March 22, 2017

Transfering Grade to Final Adjusted

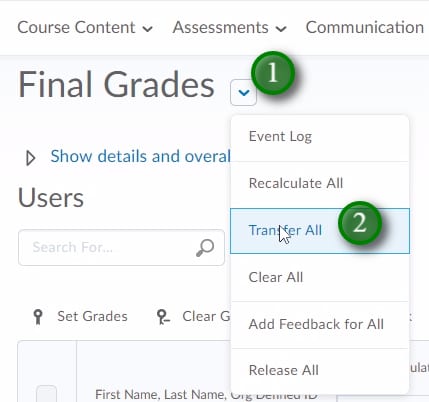
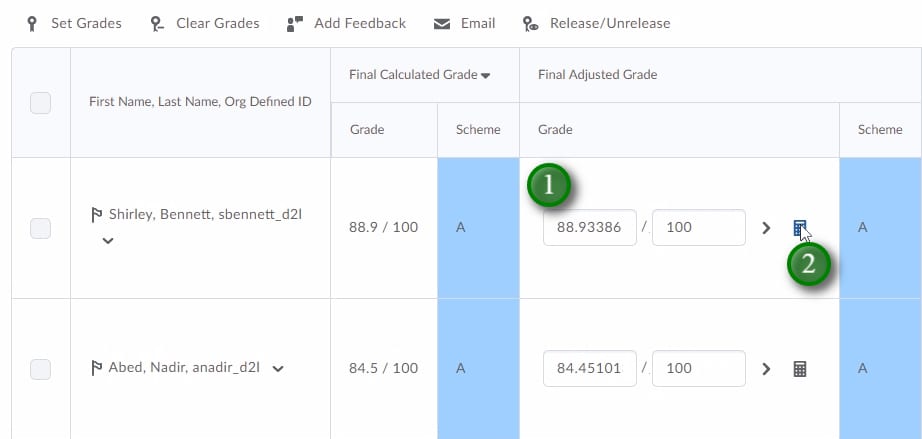
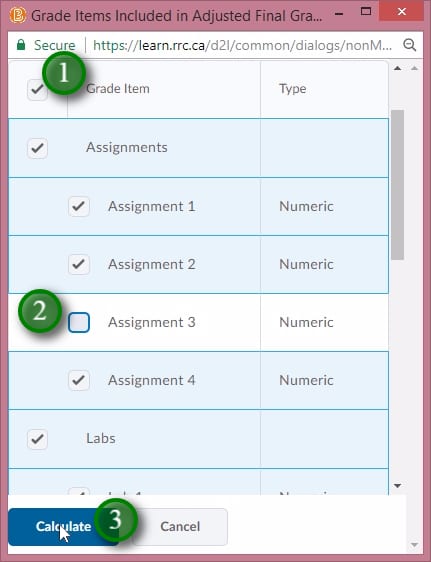
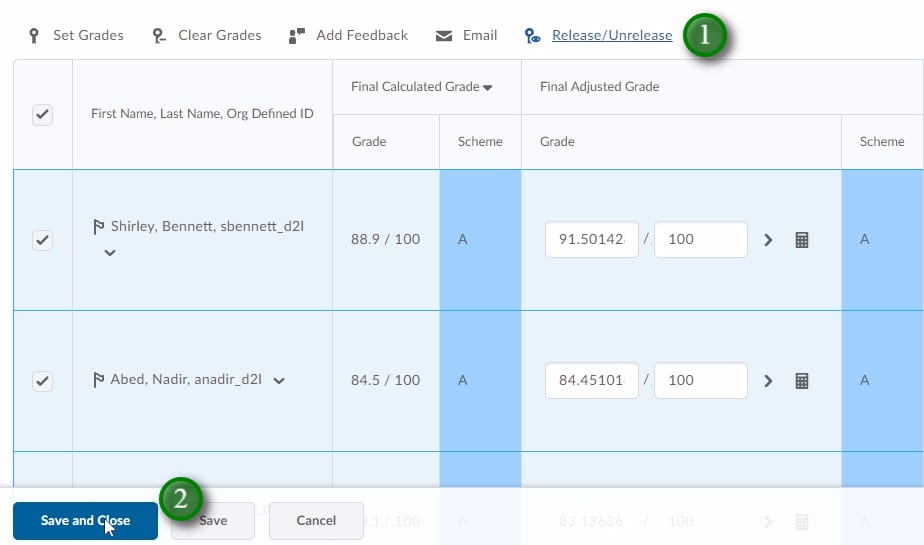
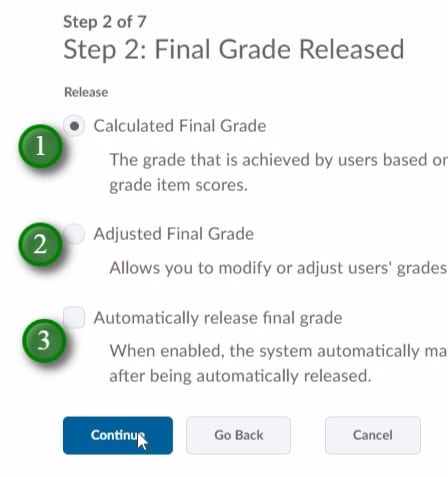
The final adjusted grade can be used to modify the final grade and drop grade items for recalculation.

  • To access, click “Assessments” (1) and “Grades” (2)

Transfering Grade to Final Adjusted;Final adjusted grade can be used to modify the final grade and drop grade items for recalculation. To access, click "Assessments" (1) and "Grades" (2)

  • Scroll to the “Final Adjusted Grade” and click its menu button (1), next click “Enter Grades” (2)

;Scroll to the "Final Adjusted Grade" and click it's menu button (1), next click "Enter Grades" (2)

  • Click the menu item beside “Final Grades” (1) to access the bulk actions for your gradebook.
  • “Recalculate All” allows you to drop grade items from the final grade calculation (if using gradebook categories your final grade will still sum out of 100% as it redistributes the grades weight within the category).
  • In most cases, you will want to transfer the calculated grade to the adjusted grade column using “Transfer All” (2).

;Click the menu item beside "Final Grades" (1) to access the bulk actions for your gradebook. "Recalculate All" allows you to drop grade items from the final grade calculation (if using gradebook categories your final grade will still sum out of 100% as it redistributes the grades weight within the category). In most cases you will want to transfer the calculated grade to the adjusted grade column using "Transfer All" (2).

  • You can manually adjust grades in the “Final Adjusted Grade” column (1), and recalculate individual users grades by clicking the calculator icon (2).

;You can manually adjust grades in the "Final Adjusted Grade" column (1), and recalculate indevidual users grades by clicking the calculator icon (2).

  • If recalculating a users grade you will be able to select all grade items (1), select or deselect individual items (2), and once done “Calculate” (3) to make the change.

;If recalculating a users grade you will be able to select all grade items (1), select or deselect individual items (2), and onse done "Calculate" (3) to make the change.

  • In some cases you may wish to release a final grade for the students in LEARN. To do this click the “Release/Unrelease” (1) option.
    Note: you may wish to review/adjust your gradebook settings by running the gradebook setup wizard before releasing the grades. The setup wizard will allow you to choose the calculated or adjusted final grade for release.
  • When everything is as you want it, click “Save and Close” (2).

;In some cases you may wish to release a final grade for the students in LEARN. To do this click the "Release/Unrelease" (1) option. Note: you may wish to review/adjust your gradebook settings by running the gradebook setup wizard before releaseing the grades. The setup wizard will allow you to choose the calculated or adjusted final grade for release. When everything is as you want it, click "Save and Close" (2).

Video:

Description:

The final adjusted grade in LEARN allows you to re-calculate the final grade based on different criteria for your class, or an individual student as well as override the calculated final grade.

LEARN – Viewing Student Grades in the Gradebook

March 22, 2017

Viewing Grades in the Gradebook

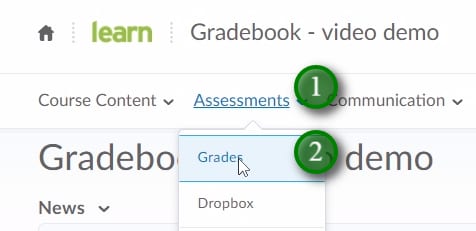
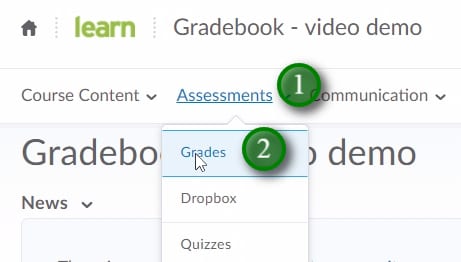
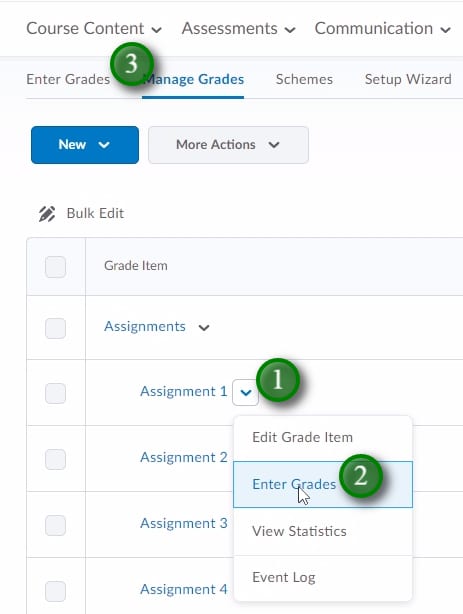
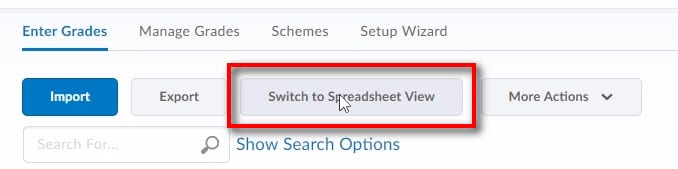
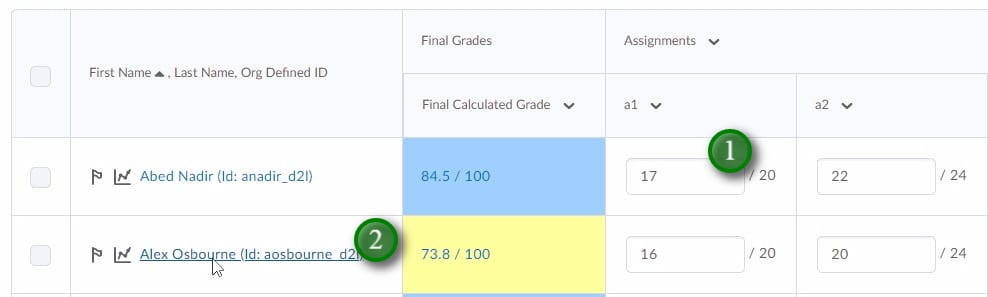
Grades can be manually viewed/entered/edited in the LEARN gradebook in a few different ways.

  • Enter the gradebook by clicking “Assessments” (1), “Grades” (2)

 Entering Grades into the Gradebook; Grades can be manually entered and edited in the LEARN gradebook in a few different ways. Enter the gradebook by clicking "Assessments" (1), "Grades" (2)

  • To view/add/edit grades for one grade item, click the menu beside the desired grade-item (1), click “Enter Grades” (2).
  • You can also enter grades for multiple grade items by clicking “Enter Grades” (3)

; To add/edit grades for one grade item, click the menu beside the desired grade-item (1), click "Enter Grades" (2). You can also enter grades for multiple grade items by clicking "Enter Grades" (3)

  • After clicking “Enter Grades” you will see your entire gradebook.
  • You will see the “Standard View” which is a colour coded display. To edit/add from the “Enter Grades” area click “Switch to Spreadsheet View”

; After clicking "Enter Grades" you will see your entire gradebook. If you receive the colour coded gradebook view, click "Switch to Spreadsheet View" to be able to add/edit multiple grade items.

  • You can now add/edit grades (1) for the entire class and all of the grade items.
  • You can view/add/edit grades for one student by clicking that students name (2).

; You can now add/edit grades (1) for the entire class and all of the grade items. You can add/edit grades for one student by clicking that students name (2).

Video:

LEARN – Gradebook Setting up Categories

March 22, 2017

Description:

Categories are a great way to organise your gradebook and they come with some advanced functions otherwise unavailable to your gradebook.

Setting up a Gradebook – Video 2 – Gradebook Setup Wizard

March 22, 2017

Description:

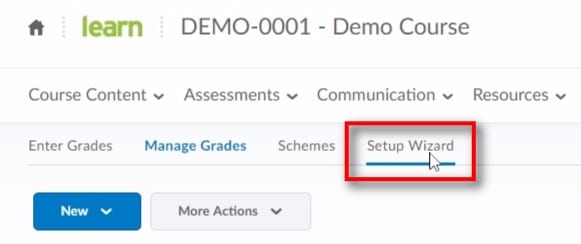
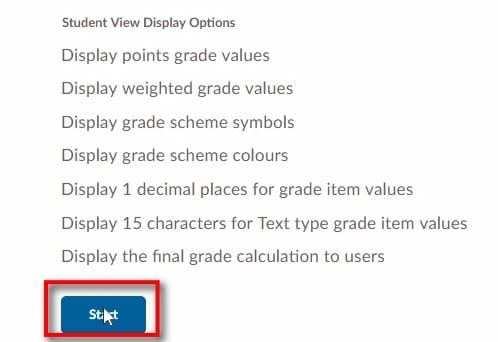
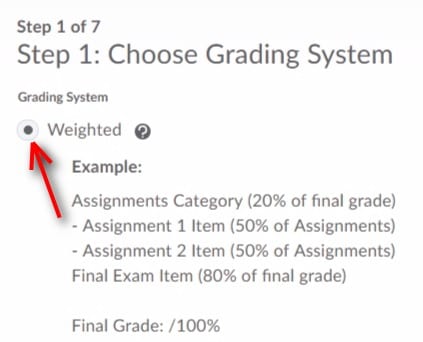
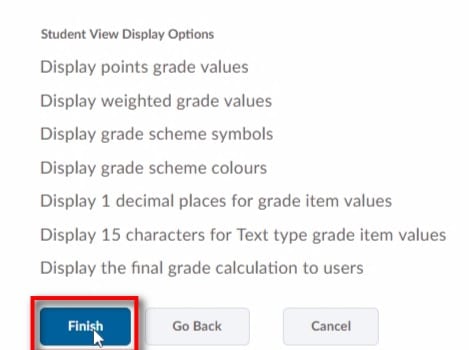
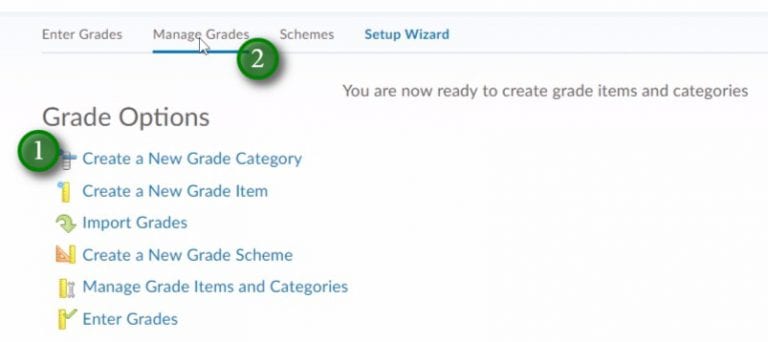
This video will walk through the Gradebook Setup Wizard in LEARN which is the recommended first step when setting up a new gradebook.

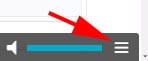
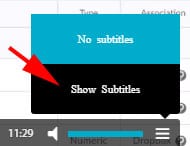
To access the captioning for this video:

  • Move your mouse to the lower right side of the video window.
  • Click the menu item represented by three dashes
    Example Image of video options menu
  • If captions are available, click “Show Subtitles”
    Example of the Show Subtitles option on Sharestream video

The Gradebook Setup Wizard

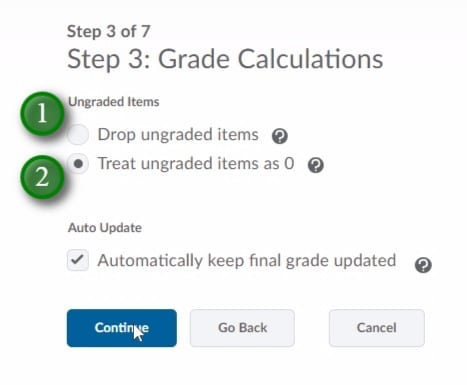
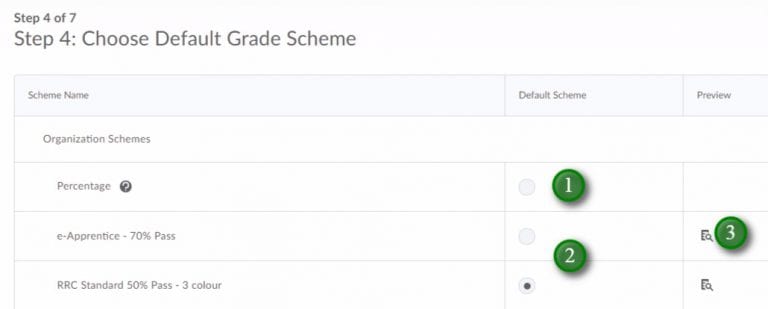
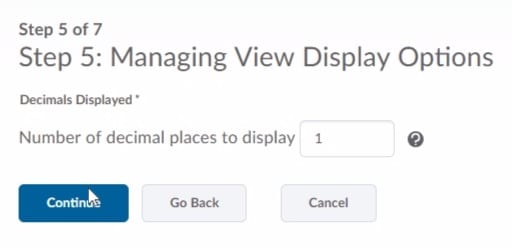
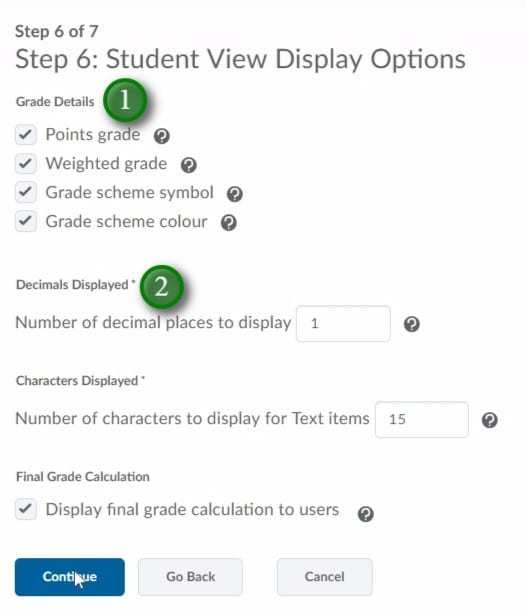
You can run the gradebook setup wizard on an existing gradebook or while setting up a new gradebook. It’s recommended as the first step when creating a new gradebook.

  • Access the Gradebook by clicking “Assessments” (1) and then “Grades” (2).
    Clicking Assessments menu and then Grades
  • Click “Setup Wizard”
    Clicking Setup Wizard under Grades
  • Review the default settings and then click “Start”
    start button in the gradebook setup wizard
  • Step 1 of 7: Select the “Weighted” grade system. You will want your gradebook to sum to 100%. Click “Continue”
    Step 1 of 7 of the Gradebook Setup Wizard
  • Step 2 of 7: Choose how you would like your final grade to be released. Note that this setting will only affect how the final grade is displayed if you release that final grade in LEARN. If you do not release the final grade this setting will have no effect on the students gradebook. “Calculated Final Grade” (1) will be based exactly on how your gradebook is setup and calculate a final grade at the end. “Calculated Final Grade” has the additional option of “Automatically release final grade” (3) which will give the students a running total of how they re doing.  “Adjusted Final Grade” (2) will require you to enter an adjusted grade for each student before releasing that final grade.
    Gradebook Setup Wizard step 2 of 7
  • Step 3 of 7: Select how ungraded items are treated. “Drop ungraded items” (1) will recalculate the grade based on what values have been entered. If a student missed an assessment you would have to enter a 0 or they will have that assessment dropped from there final calculation. “Drop ungraded items” allows for flexibility in complex gradebooks.  “Treat ungraded items as 0” (2) is the safer and more often used option. This will indicate all ungraded items are a 0 until proven otherwise.
    Gradebook setup wizard step 3 of 7
  • Step 4 of 7: Select what grade scheme you would like to use. “Percentage” (1) is a percentage only grade scheme that will not display letter grades. There are 2 default grade scheme options (2) which both include letter grades. These schemes only differ in the colour coding and red “cause for concern” indicator. You can preview these grade schemes by clicking the preview icon (3). Note: Before running the setup wizard you can click the “Schemes” option and create your own custom grade scheme. This is useful for areas that use alternate schemes such as benchmark schemes.
    Gradebook Setup Wizard step 4 of 7
  • Step 5 of 7: Enter the number of decimal places you would like to see in your gradebook. Step 6 will allow you to enter a different value for the student view. Note that this is how many are displayed, and the system will store grade values to more decimal places if entered.
  • Step 6 of 7: Select which student “Grade Details” (1) you wish for them to see, indicate the “Decimals Displayed” (2). The other defaults are typically good enough, but you can adjust them how you see fit.  Under the “Grade Details” (1) the “Points grade” is the points value you enter for the student grade, the “Weighted grade” is the what that points grade is worth towards the total grade, the “Grade scheme symbol” is typically the letter grade, and “Grade scheme colour” is part of the gradebook scheme and will indicate the cause for concern values in red.
    Gradebook Setup Wizard step 6 of 7
  • Step 7 of 7: Review the settings you have applied and click “Finish”
    Gradebook setup wizard step 7 of 7
  • After clicking finish you will be displayed some options you may wish to use (1) however all of those options are available from the “Manage Grades” (2) view.
    Gradebook Setup Wizard final screen of options

RRC Polytech campuses are located on the lands of Anishinaabe, Ininiwak, Anishininew, Dakota, and Dené, and the National Homeland of the Red River Métis.

We recognize and honour Treaty 3 Territory Shoal Lake 40 First Nation, the source of Winnipeg’s clean drinking water. In addition, we acknowledge Treaty Territories which provide us with access to electricity we use in both our personal and professional lives.

Learn more ›