Learning Technologies

Learning Technologies

Learn

LEARN and iClicker

August 16, 2013

i>Clickers have been integrated with LEARN. You can access your class roster, student’s can register their clickers in LEARN, and you can update your gradebook from the clicker software.
You will first have to update your i>Clicker software.

In the folder where your existing i>Clicker software exists create an “archive” folder. Drag your existing i>Clicker software into this folder. You can keep that for records and reference.

Next download the appropriate .zip file located below. Save that .zip file to your i>Clicker flash drive. Unzip, and then configure following the instructions found in this video.


LEARN Importing Question Banks

July 8, 2013

Tagged in: LEARN, How to Videos

Description:

Many publishers have questions banks that are easily imported into your LEARN course. You can import these into the Question Library and then select or customize the questions for your needs. Don’t worry if your publisher doesn’t list “d2l”, or “desire2learn” as a supported format, “Blackboard”, “scorm” as well as others will work just fine.

Creating an Association Between a Grade Item and a Course Based Gradable Item

July 8, 2013

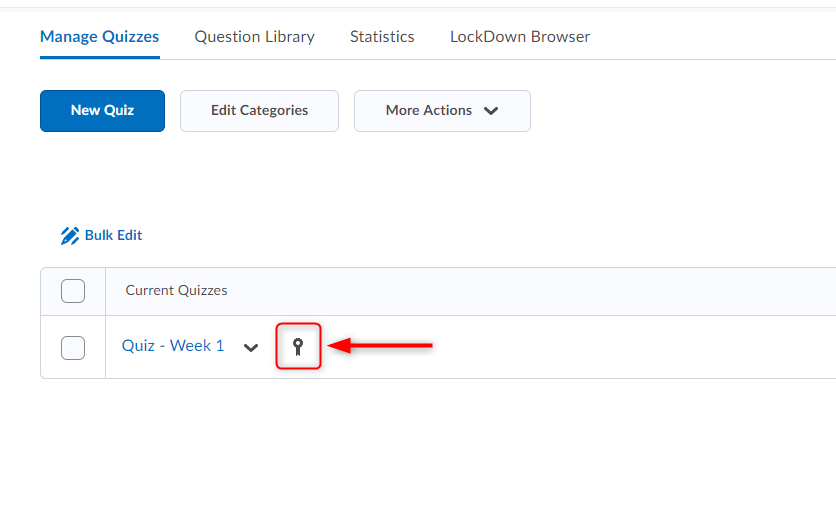
An association allows the grades from the dropbox or quiz tool to be automatically transferred over to the gradebook. This is especially useful when marking assignments in the dropbox, or when items are auto-graded in the quiz.

You create the association from the gradable item. Either as you create the gradable item, or by editing it.

Dropbox:

1. Go to an Assignment you need to link to a grade item.

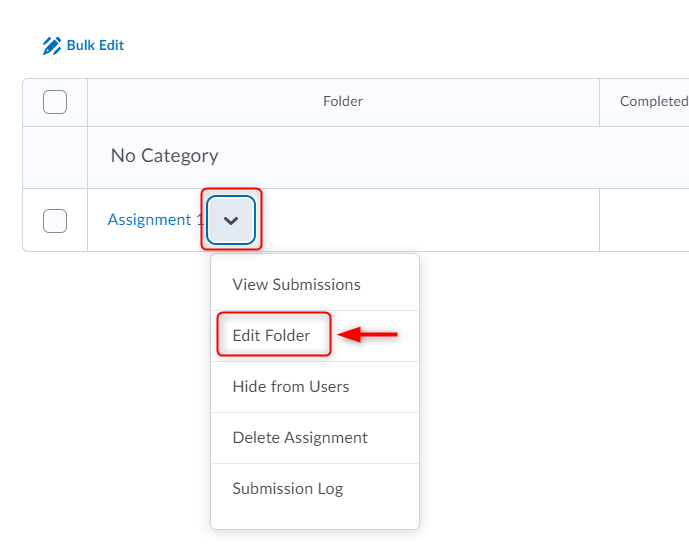
2. Click on the drop-down next to Assignment and choose “Edit Folder“.

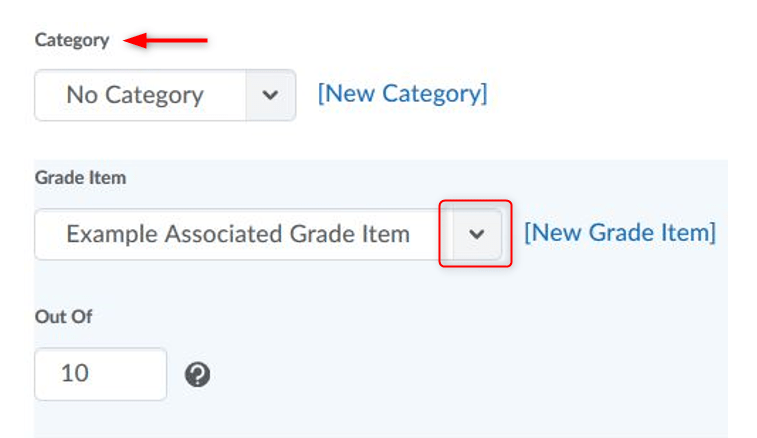
3. Use the Grade Item dropdown to select the gradebook item:

4. Click “Save and Close“.


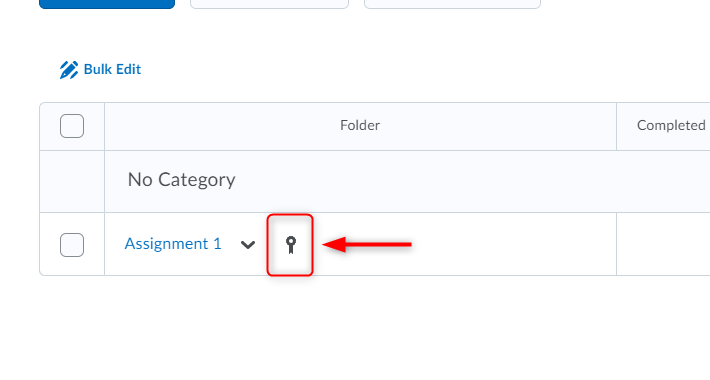
When an association is set up correctly, you will see an icon when viewing the Assignment and the association will be listed in the gradebook:

Quiz tool:

1. Go to the Quiz you need to associate with a grade item and click “Edit” your Quiz.

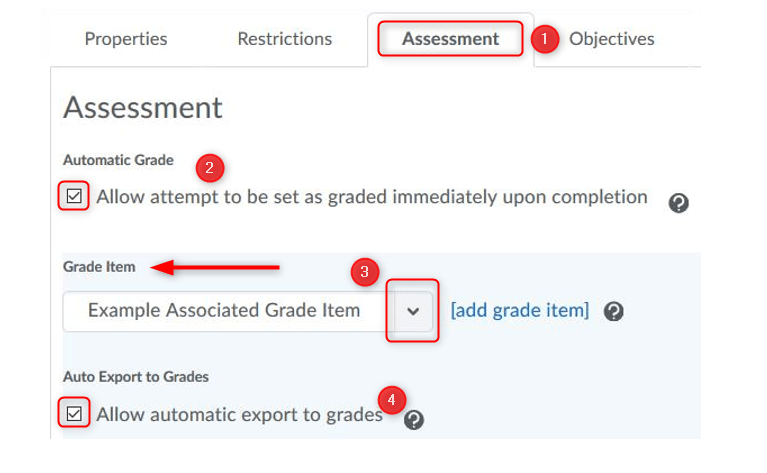
2. Click the “Assessment” (1) tab.

3. Click the “Allow attempt to be set as graded immediately upon completion” (2) if you want grades to be automatically sent to the grade book, and for the default submission view to be released to users when they complete an attempt.

4. Use the Grade Item dropdown (3) to select the gradebook item.

5. Click the “Auto Export to Grades” (4) button.

Don’t forget to “Save and Close“.


When an association is set up correctly, you will see an icon when viewing the Quiz and the association will be listed in the gradebook:

Learn Competencies

July 8, 2013

LEARN Competencies

The Competencies tool in LEARN is a great way to track Competencies, Learning Objectives, Outcomes, or Standards across your course, multiple courses or the college as a whole. You can tie activities (such as selected questions on a quiz) to learning objectives and auto track the students progress through these objectives.

To access the competencies tool enter your course, click “Edit Course”, “Competencies”, and then you can use the “New” button to begin creating your competencies and learning objectives.

For detailed instructions and explanation of the competencies tool please see the info on the following page:
https://documentation.brightspace.com/EN/le/competencies/instructor/about_competencies.htm

Video

Tagged in: LEARN, How to Videos

File Management in LEARN

April 24, 2013

Tagged in: LEARN, How to Videos

Description:

It’s a good idea to keep your uploaded files organized in LEARN. Just like on your computer it’s much easy to make changes and update items if they are organized well. This video outlines how to do this in version 10.1 of LEARN.

Embedding Video Into LEARN Content

April 24, 2013

Tagged in: LEARN, How to Videos

Description:

This video shows how to quickly and easily embed videos into your learn content. It will show how to use the integrated Youtube search, as well as embedding from an embed code.

Student Success with the User Progress Tool

April 24, 2013

Tagged in: LEARN, How to Videos

Description:

The User Progress Tool tracks several elements of your course automatically. This video shows how to use the User Progress Tool to easily analyze data to implement your own Student Success Strategy and reduce attrition.

LEARN Calendar

March 1, 2013


Tagged in: LEARN, How to Videos

Access your LEARN Calendar


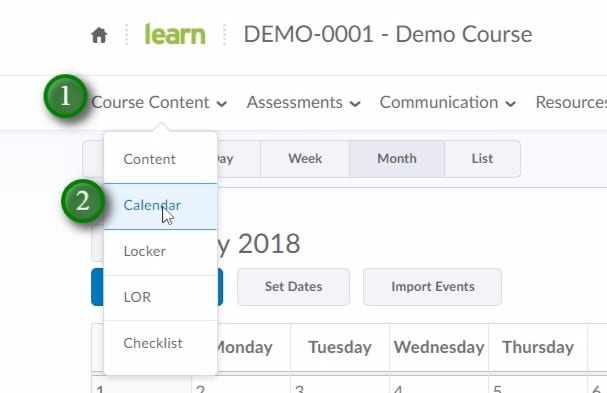
  • Enter a course
  • Click “Course Content” and “Calendar” to access LEARN Calendar

Calendar interface overview

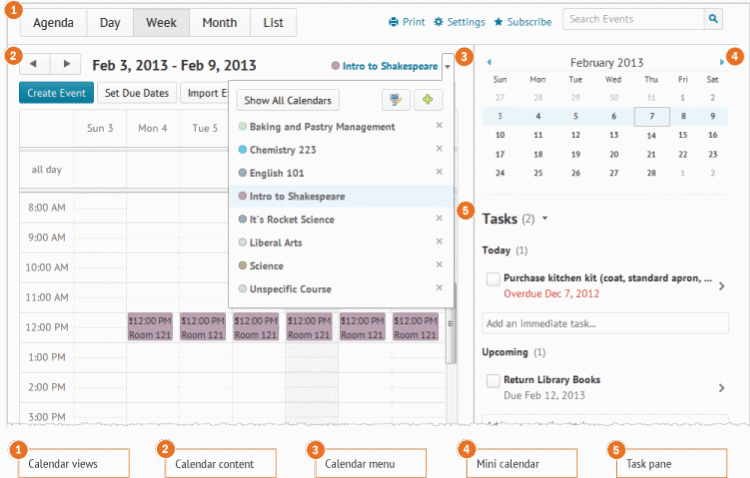
1) Use the calendar views area to toggle between different event display layouts. Use the Agenda view to group your course events by Date, Course, or Category – events display in chronological order, and all-day events display at the top of each grouped listing. Use the Day, Week, and Month views to group your events in daily, weekly, or monthly increments. Use the List view to filter your events by Assignments, Checklists, Discussions, Grades, Materials, Modules, Quizzes, and Surveys.

2) Use the calendar content area to navigate through your content. Navigation will vary depending on the view you select.

3) Use the calendar menu to select multiple calendars to display, change the color scheme associated with individual calendars, and add new calendars.

4) Use the mini calendar to navigate quickly to a specific day, week, or month.

5) Use the task pane to create, track, and maintain personal tasks.

source: https://documentation.brightspace.com/EN/le/calendar/all/calendar_interface_overview.htm

LEARN Classlist

March 1, 2013

The Classlist provides you and your students with a list of people currently enrolled in your course. The Classlist is automatically updated from the College’s Student Information System (SIS). Groups can be created to arrange students in your class and grant different access to course tools.

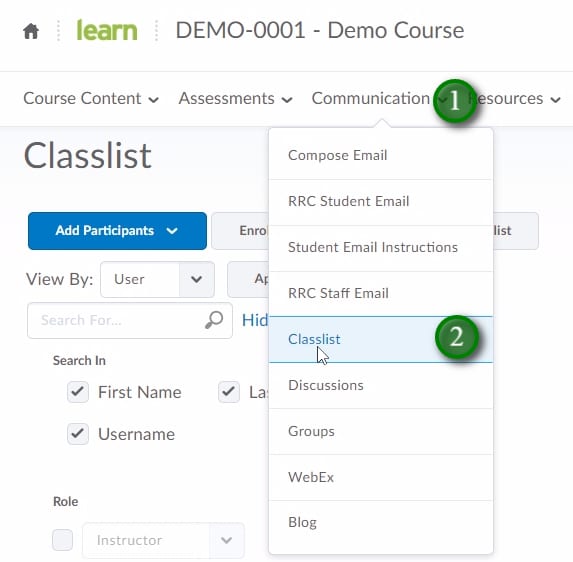
  1. To access the Classlist click “Communication” (1), and “Classlist” (2).
    Clicking Communication and Classlist in LEARN
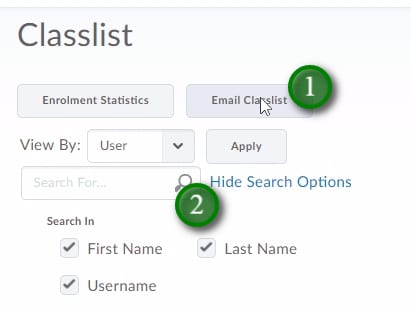
  2. From the top of the classlist you are able to Email all the users (1), and search or filter users in the classlist (2).
    Email Classlist and Search Classlist options examples
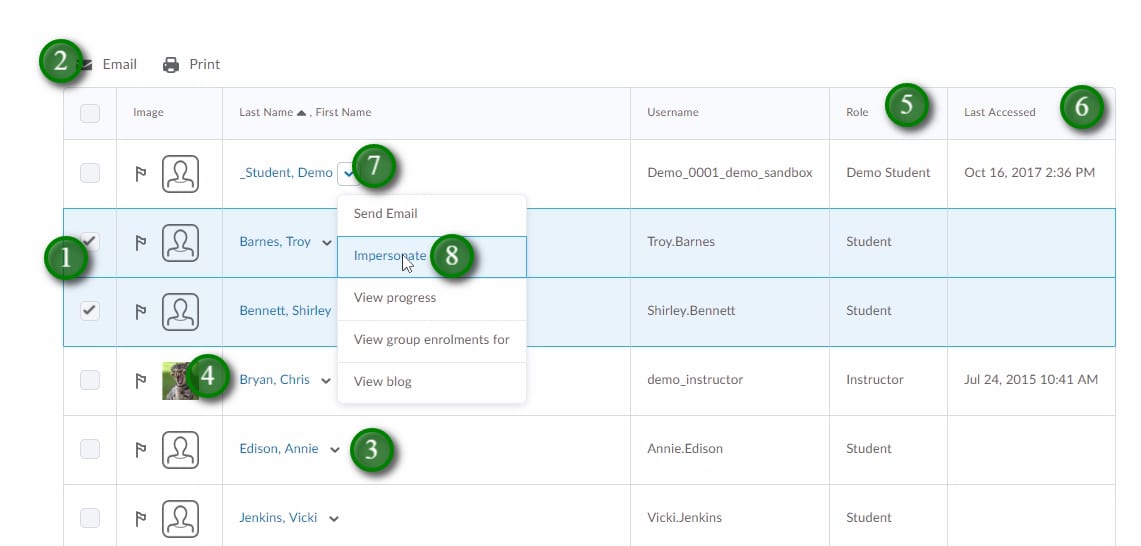
  3. You can select groups of users (1) and email them. (2)
    You are able to email individual users by clicking their name (3).
    Click on a users profile picture (4) will reveal their profile information.
    The classlist will list the user’s role in the course (5), and the “Last Accessed” column (6) shows when they were last in the course.
    Clicking the menu button (7) beside a users name will allow you to access options related to that user. If the user is a demo student, you can impersonate them (8) to see the course from a demo student perspective.
    Classlist options


LEARN Cleaning a Course Master

March 1, 2013

Tagged in: LEARN, How to Videos

Description:

This video shows you how to clean content out of an old course master. This will allow you to copy new content into it and insure you don’t create duplicates or have stray files.

RRC Polytech campuses are located on the lands of Anishinaabe, Ininiwak, Anishininew, Dakota, and Dené, and the National Homeland of the Red River Métis.

We recognize and honour Treaty 3 Territory Shoal Lake 40 First Nation, the source of Winnipeg’s clean drinking water. In addition, we acknowledge Treaty Territories which provide us with access to electricity we use in both our personal and professional lives.

Learn more ›