Learning Technologies

Learning Technologies

Learn

LEARN – Gradebook Setting up Categories

March 22, 2017

Description:

Categories are a great way to organise your gradebook and they come with some advanced functions otherwise unavailable to your gradebook.

Setting up a Gradebook – Video 2 – Gradebook Setup Wizard

March 22, 2017

Description:

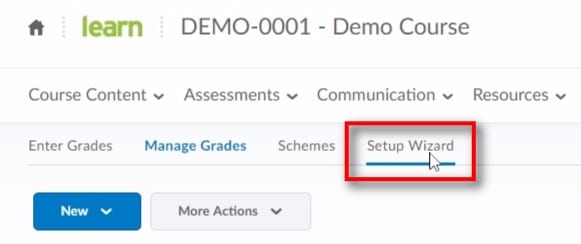
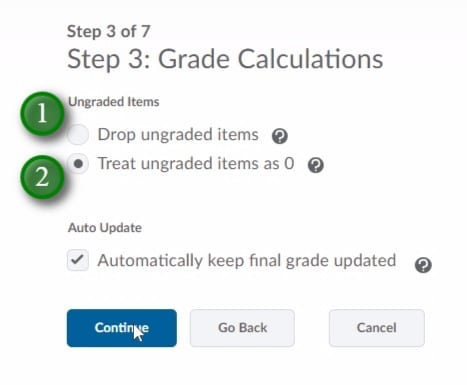
This video will walk through the Gradebook Setup Wizard in LEARN which is the recommended first step when setting up a new gradebook.

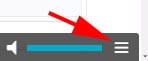
To access the captioning for this video:

  • Move your mouse to the lower right side of the video window.
  • Click the menu item represented by three dashes
    Example Image of video options menu
  • If captions are available, click “Show Subtitles”
    Example of the Show Subtitles option on Sharestream video

The Gradebook Setup Wizard

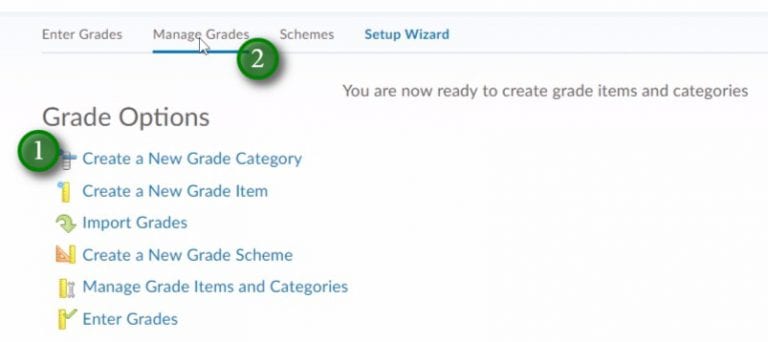
You can run the gradebook setup wizard on an existing gradebook or while setting up a new gradebook. It’s recommended as the first step when creating a new gradebook.

  • Access the Gradebook by clicking “Assessments” (1) and then “Grades” (2).
    Clicking Assessments menu and then Grades
  • Click “Setup Wizard”
    Clicking Setup Wizard under Grades
  • Review the default settings and then click “Start”
    start button in the gradebook setup wizard
  • Step 1 of 7: Select the “Weighted” grade system. You will want your gradebook to sum to 100%. Click “Continue”
    Step 1 of 7 of the Gradebook Setup Wizard
  • Step 2 of 7: Choose how you would like your final grade to be released. Note that this setting will only affect how the final grade is displayed if you release that final grade in LEARN. If you do not release the final grade this setting will have no effect on the students gradebook. “Calculated Final Grade” (1) will be based exactly on how your gradebook is setup and calculate a final grade at the end. “Calculated Final Grade” has the additional option of “Automatically release final grade” (3) which will give the students a running total of how they re doing.  “Adjusted Final Grade” (2) will require you to enter an adjusted grade for each student before releasing that final grade.
    Gradebook Setup Wizard step 2 of 7
  • Step 3 of 7: Select how ungraded items are treated. “Drop ungraded items” (1) will recalculate the grade based on what values have been entered. If a student missed an assessment you would have to enter a 0 or they will have that assessment dropped from there final calculation. “Drop ungraded items” allows for flexibility in complex gradebooks.  “Treat ungraded items as 0” (2) is the safer and more often used option. This will indicate all ungraded items are a 0 until proven otherwise.
    Gradebook setup wizard step 3 of 7
  • Step 4 of 7: Select what grade scheme you would like to use. “Percentage” (1) is a percentage only grade scheme that will not display letter grades. There are 2 default grade scheme options (2) which both include letter grades. These schemes only differ in the colour coding and red “cause for concern” indicator. You can preview these grade schemes by clicking the preview icon (3). Note: Before running the setup wizard you can click the “Schemes” option and create your own custom grade scheme. This is useful for areas that use alternate schemes such as benchmark schemes.
    Gradebook Setup Wizard step 4 of 7
  • Step 5 of 7: Enter the number of decimal places you would like to see in your gradebook. Step 6 will allow you to enter a different value for the student view. Note that this is how many are displayed, and the system will store grade values to more decimal places if entered.
  • Step 6 of 7: Select which student “Grade Details” (1) you wish for them to see, indicate the “Decimals Displayed” (2). The other defaults are typically good enough, but you can adjust them how you see fit.  Under the “Grade Details” (1) the “Points grade” is the points value you enter for the student grade, the “Weighted grade” is the what that points grade is worth towards the total grade, the “Grade scheme symbol” is typically the letter grade, and “Grade scheme colour” is part of the gradebook scheme and will indicate the cause for concern values in red.
    Gradebook Setup Wizard step 6 of 7
  • Step 7 of 7: Review the settings you have applied and click “Finish”
    Gradebook setup wizard step 7 of 7
  • After clicking finish you will be displayed some options you may wish to use (1) however all of those options are available from the “Manage Grades” (2) view.
    Gradebook Setup Wizard final screen of options

The Awards Tool – Badges

March 22, 2017

Description:

Badges are awarded based on any criteria determined by the instructor. They are meant to provide digital markers that represent accomplishment throughout a course or program. Badges do not contribute to achieving a passing grade; however, badges are awarded for achievements that also can contribute to the type of work ethic that results in a passing grade. For example, an instructor might create a badge that is based on posting 15 discussion posts in the first month of a course, or on perfect attendance, or on academic excellence. These items are the types of trends that can help a learner to succeed in a course or program.

Gradebook – Student View: Hiding and Releasing Grade Items and Details

April 26, 2016

Gradebook – Student View:  Hiding and Releasing Grade Items and Details

LEARN’s gradebook is a flexible tool that gives instructors a great deal of control over how information is released to students.

Hiding a Grade Item or Category from Student View

There are many reasons you may wish to hide a grade item or category from student view.  You may wish to release grade items on a specific date, or only show a cumulative grade through the category.

Note:  Hiding grade items within a category may still display a grade on the category depending on the category settings.

Hiding/Releasing a Grade Item

  • Enter Course
  • Click “Assessments”, and “Grades”
    LEARN_assessments_grades
  • From “Manage Grades” click the “action” button (Framework.ContextMenu.dropArrow) beside the grade item you wish to hide/release, then click “Edit Grade Item”
    LEARN_Edit Grade Item
  • Click “Restrictions”
    LEARN_Edit Grade Item_Restrictions
  • Adjust the “Visibility” settings
    • Grade item is always visible” will allow a student to see this grade item unless a release condition is restricting it’s view or there are higher level restrictions on its category
    • Hide this grade item” will hide the grade item from student view until this setting is removed
    • Grade item is visible for a specific date range” will allow for a timed release of the grade item unless a release condition is restricting its view or there are higher level restrictions on its category
    • Release Conditions can be applied to any grade item. A release condition in its simplest form is a setting that will restrict the release of an item until a defined condition has been met

Hiding/Releasing a Grade Category

To hide/release a grade category follow the same steps outlined for a grade item, except select the “Edit Grade Item” from the category’s “action” button (Framework.ContextMenu.dropArrow).  When you apply a restriction to a category it will apply the chosen settings to the items within that category.  Individual settings can still be applied to the item within allowing for staggered releases etc.  Note that even if an individual item in a category is hidden from student view a category by default will show a cumulative grade unless you change those settings.

Changing the Display Settings on a Grade Item or Category

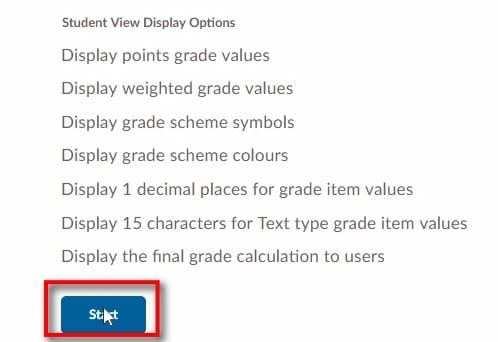
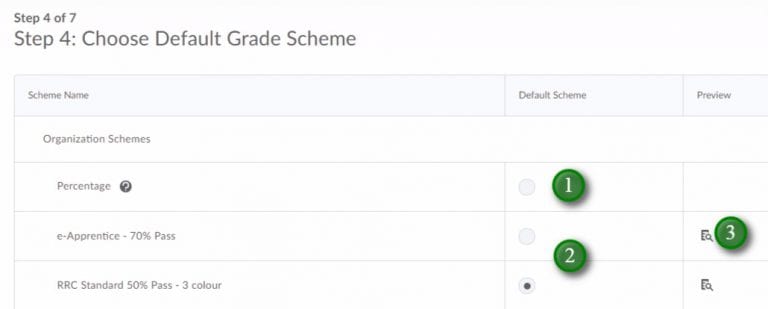
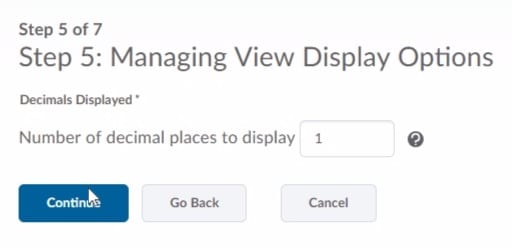
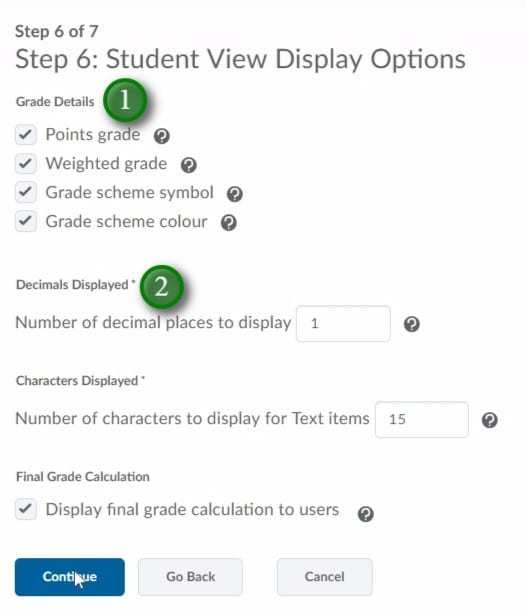
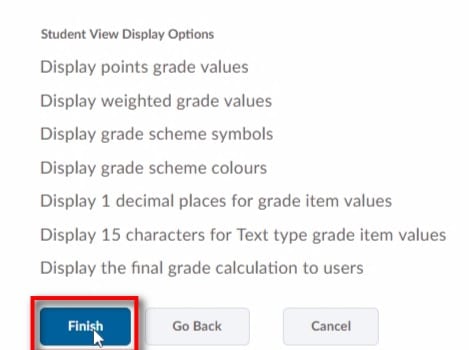
When you first run the “Gradebook Setup Wizard” you made some decisions on what grade details you would like the students to see.  You can run the wizard at any point to make changes, make changes in settings or override those settings on individual grade items and categories.

Gradebook Setup Wizard

  • Enter Course
  • Click “Assessments”, and “Grades”
  • Click “Gradebook Setup Wizard”
    LEARN_Gradebook_setup_wizard
  • Click “Start”
  • Follow the prompts

Settings

  • Enter Course
  • Click “Assessments”, and “Grades”
  • Click “Settings” near the upper right hand corner of the page
    LEARN_gradebook_settings
  • Click “Personal Display Options” to adjust settings for your view
    LEARN_Gradebook_Personal Display Options
  • Click “Org Unit Display Options” to adjust settings for student view

Override Settings in Grade Items/Categories

  • Enter Course
  • Click “Assessments”, and “Grades”
    LEARN_assessments_grades
  • From “Manage Grades” click the “action” button (Framework.ContextMenu.dropArrow) beside the grade item or category you wish to modify the student view in and click “Edit Grade Item”
    LEARN_Edit Grade Item
  • Under “Properties” scroll to the bottom of the page, click “Show Display Options” if it is hidden
    LEARN_gradebook_display_options
  • Apply any optional “Student View” settings you may want
    LEARN_gradebook_display_options_2
  • Click “Override display options for this item” and remove or add options
    • By removing all options under “Override display options for this item” the student will not see any grade for that item. This may be an appropriate setting for a grade category if you are staggering the release of the individual grade items

Click “Save” or “Save and Close”

Releasing the Final Grade

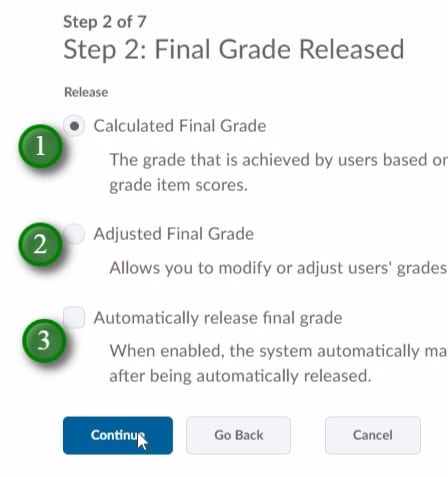
By default the final grade is not visible to students.  It is up to the instructor if/when they wish to release that final grade to the students.

When using the “Gradebook Setup Wizard” to apply the initial settings in the gradebook, you will have decided if you wanted to release the final calculated or adjusted grade to the students. This setting will only affect what the student is able to see.  For your reference and purposes both the calculated and adjusted final grades are available.  You will notice throughout the wizard, and when you view the gradebook settings that there are distinct settings for student or instructor view.

Releasing the Calculated or Adjusted Final Grade

You can opt to release the final calculated grade at any time during a course. Releasing the final calculated grade early will show the students a running total of how they are doing in the course. Note that your program may have policies about not releasing the final grades to students outside of Webadvisor.

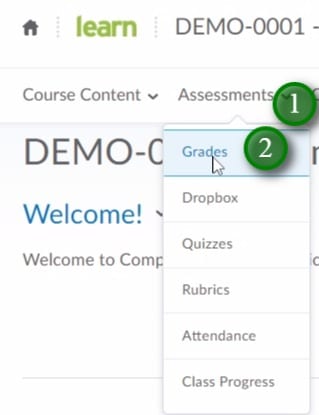
To release the calculated or final grade:

  • Enter your course
  • Click “Assessments”, and “Grades”
    LEARN_assessments_grades
  • From Enter Grades or Manage Grades click the “action” (Framework.ContextMenu.dropArrow) button beside “Final Calculated Grade”, then click “Enter Grades”
    LEARN_Gradebook_entergrades
  • Note whether you are releasing the final adjusted or calculated grade based on the settings applied in the “Gradebook Setup Wizard” or settings
    LEARN_Release Final Adjusted Grade

    • If you are releasing the final adjusted grade, you will first have to transfer all grades to the “Final Adjusted Grade” column
      • Click the “action” button (Framework.ContextMenu.dropArrow) beside “Final Grades” (near the top of the page), click “Transfer All” or “Recalculate All”, make any adjustments needed and then “Save”
        LEARN_transfer_all
    • Click the “action” button (Framework.ContextMenu.dropArrow) beside “Final Grades” (near the top of the page), click “Release All”
      • Manually release or un-release grades to specific students by checking or un-checking the box under the “Release Final Grade” column
    • Click “Save”

Using Templates in LEARN

February 25, 2015

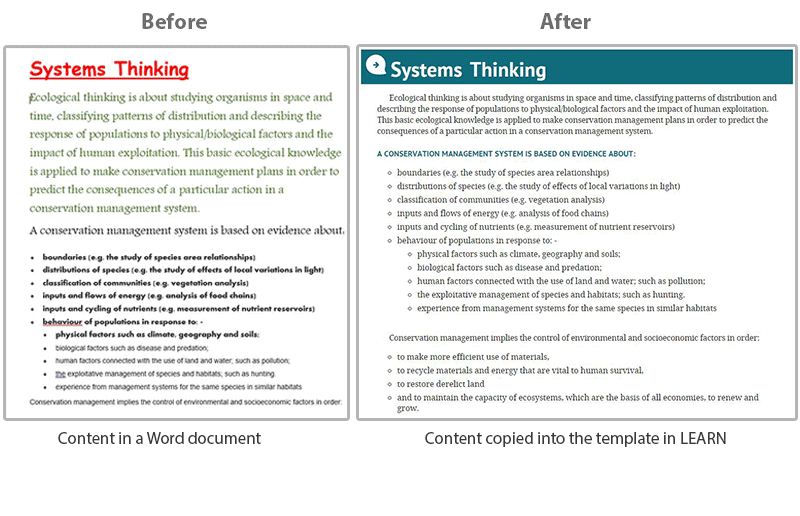
LEARN Templates are an easy way to give your course content a unified and professional look and feel. You don’t need any design or programming knowledge, all you need to do is copy and paste!

Templates are a great way to not only make your course content look good but also to give it a consistent look and feel between pages and topics. When course content has a consistent and professional look, it is easy to read and follow for students and helps them focus on the important information in your course without potentially clumsy and distracting formatting.

The look of a page done in Microsoft Word before and after template formatting. Read More →

Four Levels of Learning Management System Usage

February 17, 2015

For years I have been talking about doing some deep analytics on RRC’s usage of its LMS. This information is valuable to the College and the Teaching Learning Technology Centre in many ways:

  • It helps us identify and learn from excellent usage of technology
  • It helps us identify and learn from poor use of technology
  • It gives us focus and targets for training – where are we in the use of certain tools?
  • It informs us on the depth of our students’ experience with educational technology at RRC
  • It can give us incredible insights into the nature of courses through analyzing gradebooks and assessments
  • On an active basis it can allow us to identify students who may be at risk of attrition and direct them towards remedial resources

Fundamentally it allows us to learn from our successes and failures and use that information to embark on new paths. Read More →

Developing Your Course with the Course Builder Tool

October 9, 2014

Course Builder

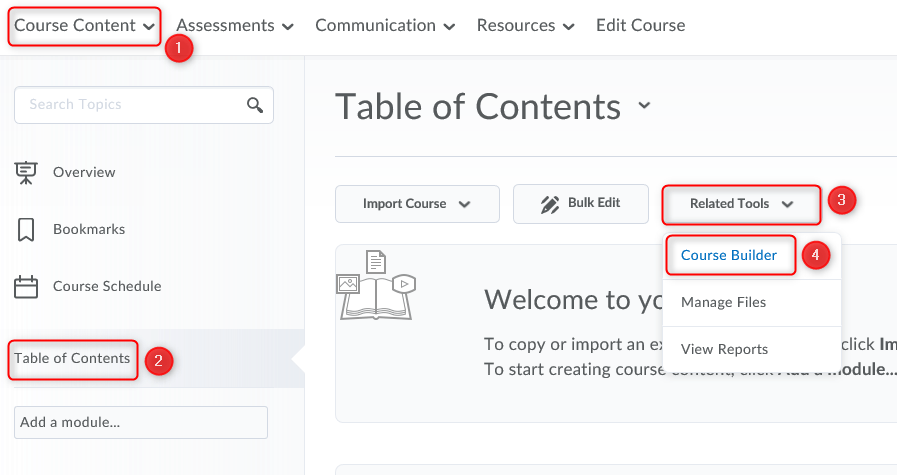
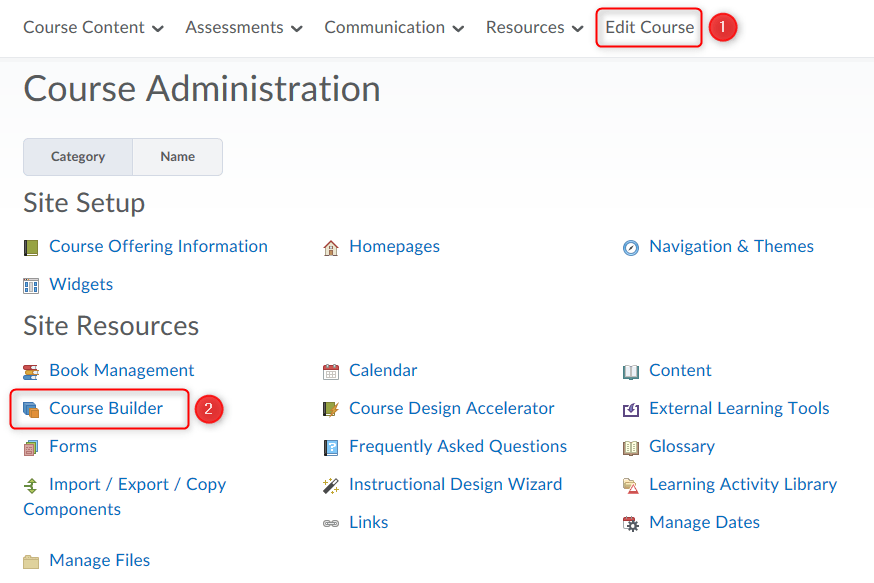
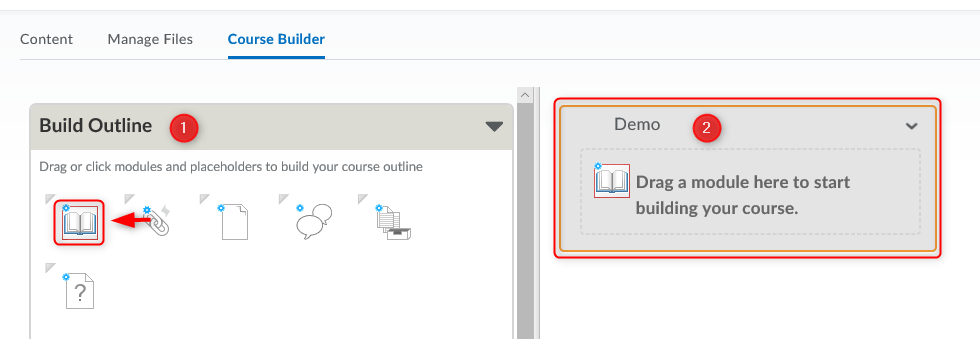
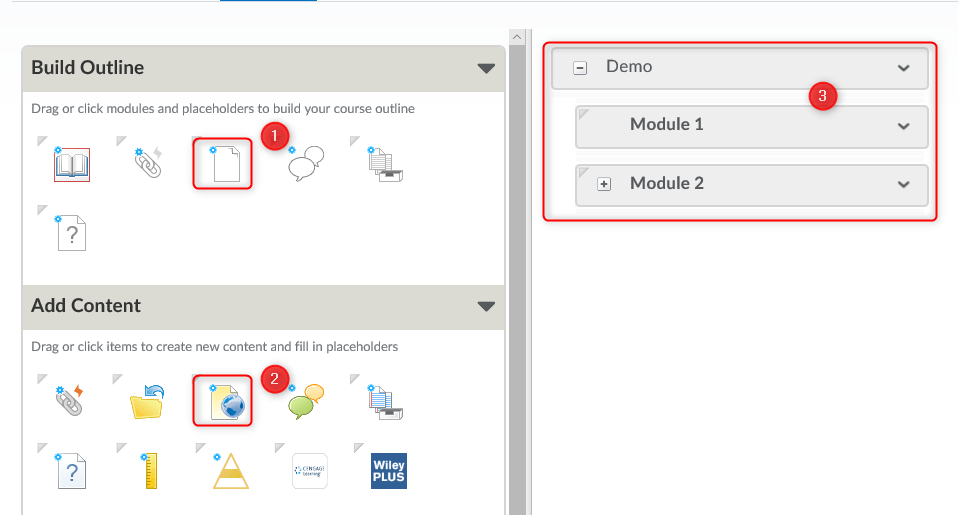
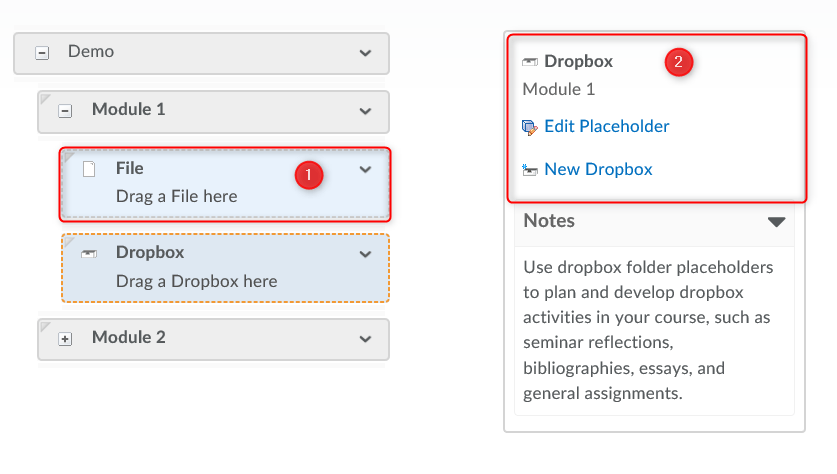
The Course Builder Tool allows you to map and plan out your course before adding content. You can apply place holders for content, quizzes, dropbox, etc. and easily apply the content when ready. Creating the association from an assessment item to the gradebook is made easy through the drag and drop interface.

How to access Course Builder? (Written guidelines)

  1. To access Course Builder, enter your course, click “Course Content”, “Content” (1), “Table of Contents” (2), “Related Tools”(3), and “Course Builder” (4)

    You can also access Course Builder by clicking “Edit Course” (1), and “Course Builder” (2)
  2. You are able to build placeholders in your course by dragging them from the “Build Outline” area (1) to the course structure area (2)
  3. You are able to lay out your modules and placeholders (1), as well as add content that is ready to be added (2). Both simply have to be dragged to the course structure area (3)
  4. When it comes time to add content to placeholders, simply click on the placeholder in the course structure area (1), and then access the options that appear in the panel to the right (2)

RRC Polytech campuses are located on the lands of Anishinaabe, Ininiwak, Anishininew, Dakota, and Dené, and the National Homeland of the Red River Métis.

We recognize and honour Treaty 3 Territory Shoal Lake 40 First Nation, the source of Winnipeg’s clean drinking water. In addition, we acknowledge Treaty Territories which provide us with access to electricity we use in both our personal and professional lives.

Learn more ›