Academic Success

Student Accessibility Services

Tech Tips: Work Smarter, Not Harder

How to Download and Sync Your LEARN Calendars

September 15, 2022

Students can download their LEARN (Brightspace) calendar into their main personal calendar (e.g. Outlook, Google Calendar, iPhone, etc…).

Creating a URL for the Calendar in LEARN

First students will need to create a URL for their calendar in LEARN.

  1. Navigate to LEARN
  2. Select the course you are wanting to sync the calendar from
  3. Towards the top left hand corner of your screen, click on “Course Content” and then “Calendar”
    Screenshot of LEARN
  4. A new page will open. Towards the top of the screen, there is a toolbar containing the “settings” button. Click on the settings button (located on the right of the toolbar).
    Screenshot of LEARN
  5. A pop-up window will appear. Within the pop-up window, check off the box beside “Enable Calendar Feeds”.
  6. Click on save. The pop-up window will close.
    Screenshot of LEARN
  7. Click on “subscribe” (just to the right of the settings button).
    Screenshot of LEARN
  8. A pop-up window will appear. In this pop-up window students have the ability to select which courses they’d like to sync calendars for:
    1. You can select each course, one by one – though if you choose this method you’d need to go through this process for each and every course you’d like to sync your calendar for
    2. You can select the option for “all calendars and tasks” – this will sync all calendar info and tasks from any LEARN courses you are currently registered in.
      Screenshot of LEARN
  9. Copy the URL that is listed in the pop-up window. Click on close.

Importing LEARN Calendars into your Main Calendar

Once you’ve created a URL for your LEARN calendar(s), you can add those calendar(s) to your main/personal calendar. Exactly how to do this is going to differ depending on what platform you use as your main or personal calendar. For details on how to import external calendars into commonly used main/personal calendars, please visit the links below:

  • Google Calendar: Adding someone else’s Google calendar (expand the section on “add using a link”)
  • Apple Calendar: Set up multiple calendars on iPhone (scroll down to section on “subscribe to a calendar”)

Note: If new items are added to a LEARN calendar after you’ve already synced to your main calendar, there is a delay between the item being added to the LEARN calendar, and when it appears in the main calendar. Students are responsible for ensuring accuracy of important dates, or adding in any dates that might not already be reflected.

Kurzweil 3000 Self-Registration

September 15, 2022

  1. Visit the RRC Polytech Kurzweil Self-Registration link
  2. Fill in all the information requested
    1. First name
    2. Last name
    3. Email address (this must be your RRC Polytech academic or staff email address, i.e. StuDent@academic.rrc.ca or staff@rrc.ca – any accounts created with other email addresses will be deleted)
    4. School/Org – Red River College
    5. External ID – student or staff ID number
  1. Click the “Add New” button
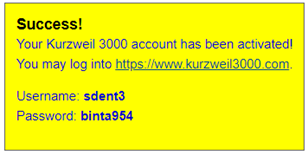
  2. If you entered all information required, the page will refresh and list your username and password. This login information is not to be shared with anyone.
Success message

Note: If you entered information incorrectly or missed information, the page will refresh and indicate any errors. Update the incorrect/missing information, and click add new again.

Need help?

Please send an email to altformat@rrc.ca indicating the issue or concern you have. We ask that you please include a detailed description of the issue or attach a screenshot of any error messages so that we are better able to support you.

Different Versions of Kurzweil 3000

Desktop

For full functionality, download and install Kurzweil 3000 on your computer. The files are quite large and it is recommended that you have a good internet connection during download.

Steps for installation:

  1. Click on one of the links above
  2. Choose the “subscription/web license” version
  3. Follow the prompts to install the software
  4. Log in to the software using your Kurzweil 3000 username and password – the first time you log in you will need to be connected to the internet

Web Extension (ReadTheWeb)

You can download a Kurzweil web extension for Firefox or Chrome browsers on your desktop or laptop computer. This is a great resource as the web extension of Kurzweil allows you to read any content on the internet aloud, including content in LEARN!

PDF: Setting Up Kurzweil Web Extensions

Web Version

If you don’t want to download anything, you can utilize Kurzweil 3000 through the internet with the web version. This version is for reading compatible files from your computer, not for reading internet pages to you (that’s the web extension).

Apps for your phone or tablet

“Kurzweil” apps available in the Apple or Play store are developed by third-party companies and will not work with your username and password. It is not recommended that you download any of these apps.

Kurzweil Web Extension and LEARN

Once you have downloaded one of the web extension versions, follow these steps to access Kurzweil ReadTheWeb and have LEARN content read aloud:

  1. Open the extension by clicking on the small Kurzweil 3000 icon in the top right corner
Kurzweil extension
  1. Enter your username and password into the pop-up window
Username and password window
  1. Adjust Kurzweil’s setting to your preferences. Click on the settings button.

What is each setting?

  • Voice – Kurzweil has multiple voice options built-in, including different accents
  • Reading speed – the speed at which Kurzweil reads content
  • Unit – what Kurzweil reads
  • Mode – how Kurzweil reads
    • Example: with the sentence unit and continuous mode, Kurzweil would read a sentence, continuously, until there is nothing left to read or you hit pause
  • Read alternate text for images – Kurzweil will read aloud any alternate text that has been entered for images
  • Position – where the Kurzweil 3000 toolbar sits on your window
Kurzweil settings

Tech Tips – Work Smarter, Not Harder!

September 9, 2022

Image Description: an open laptop and a plant on a table. On the screen of the laptop is the text "Tech Tips, work smarter, not harder". In the bottom right corner of the image is text "presented by student accessibility services" and the RRC Polytech logo.

Student Accessibility Services is proud to launch our new Tech Tips blog!

The goal: encourage the use of technology to make your academic life easier!!

Ask yourself these questions:

  • Are you an auditory learner and would rather listen to text than read text?
  • Do you want tips on how to reduce eye strain from computer use?
  • Do you find yourself having trouble staying on top of due dates, assignments, and coursework?
  • Are you a multi-tasker looking for ways to work on your courses while getting chores done around the house (or getting out and enjoying nature)?
  • Do you need help taking notes? Studying? Thought organization? Task/time management?
  • Do you want to have different options and mix things up?!
  • Are you willing to give tech a chance and see how it can support you?!

Then stay tuned for upcoming posts! We’ll highlight features of programs you already have, are available to you as an RRC Polytech student, or are available for FREE!

Notices will be posted in Student and Staff news when new blog posts are added… We all learn differently, so why can’t we all use tech differently?!

RRC Polytech campuses are located on the lands of Anishinaabe, Ininiwak, Anishininew, Dakota, and Dené, and the National Homeland of the Red River Métis.

We recognize and honour Treaty 3 Territory Shoal Lake 40 First Nation, the source of Winnipeg’s clean drinking water. In addition, we acknowledge Treaty Territories which provide us with access to electricity we use in both our personal and professional lives.

Learn more ›