Learning Technologies

Learning Technologies

Building Your Gradebook

Building Your Gradebook

Gradebook Readiness Checklist:

  • Ran the Gradebook Setup Wizard
  • Grade items are in Categories
  • Gradebook items are linked (associated) with the tools that grade them in LEARN (dropbox, quizzes)
  • The Gradebook sums to 100%
  • The Categories sum to 100%
  • There are no “Notes” at the top of the Manage Grades page
  • Grade items are weighted correctly
  • LEARN Gradebook Readiness Checklist PDF

Gradebook Setup Wizard

When you first enter the gradebook area of your LEARN course you will be directed to the Gradebook Setup Wizard, which will step you through the settings you may want to use for your Gradebook. This document will walk you through each setting. Feel free to try different things out as the settings are non-destructive – you can always go back and run the wizard again if you decide to adjust anything.  Remember that anywhere you see the question mark icon you can click on it to find more information about that setting.

Accessing the Gradebook Setup Wizard

  1. Log into LEARN
  2. Access the Course, Development MASTER, or Sandbox that you wish to set a gradebook up in.
  3. Click “Assessments”, and then “Grades
    assessment_grades
  4. Click “Setup Wizard
    setupwizard
  5. You will see text displaying the default settings (if this is the first time this gradebook has been set up), or whatever settings were last applied to the gradebook. To run the setup wizard click “Start
    setupwizardstart

Gradebook Setup Wizard Settings/Options

Step 1: Choose Grading System

  1. In most cases you will want a Weighted Gradebook.  This will be a gradebook that sums to 100%.  Your gradebook will still accept entered grades in points.
    choosing grading system
  2. Click “Continue”
    continue

Step 2: Final Grade Released

    1. Both calculated and adjusted will calculate the final grade for you. The Adjusted grade gives you the opportunity to overwrite what the system has calculated for all students, or individual students before releasing that final grade.  The calculated final grade will calculate when using the adjusted final grade.
      • If you wish to have the students calculated final grade available to them before the end of the course, select calculated and then make sure to release that calculated final grade.
        • Release the calculated or adjusted final grade by clicking the action button (small triangle) beside adjusted or calculated final grade, click “enter grades“, select students and click “release/unrelease
        • You can change your gradebook from calculated final grade to adjusted final grade at any time during the delivery of the course.
  1. Click “Continue”

Step 3: Grade Calculations

  1. Selecting “Drop Ungraded Items” means that the gradebook will not include ungraded items in its calculations. If you are allowing students to view their final grades as they progress it will show them how they are doing so far in the course. It also allows for a more flexible gradebook as you can omit grade items for individual users or the course simply by not entering a grade. Please be aware that if someone fails to complete an assignment or take a quiz and earns a ‘0’, you will have to manually enter that 0 into the gradebook.
  2. Selecting “Treat Ungraded Items as Zero” will create a gradebook where all grades are 0 until a higher grade is entered.  This will be a gradebook that needs little intervention.  One potential issue here is that the final grade will show students a very low or failing grade until they have completed all of their assessments. It is calculated as the mark the student would receive if they were to walk away from the course at that point. If you do not release the final grade until the course is completed then this will not impact students.
    • We recommend “Treat Ungraded Items as Zero” unless you have a specific need to drop grade items during the delivery.
      treatungradeditemsaszero
  3. Click “Continue

Step 4: Choose Default Grade Scheme

  1. You are able to create custom grade schemes by clicking the “Schemes” button at the top of the page. Since this will exit the wizard without saving, you may wish to set up a scheme before running the gradebook setup wizard so that that scheme available alongside the defaults. The defaults are based on real RRC Polytech grade schemes.
  2. You can click the preview button (Shared.Main.actPreview) to see how any of the existing schemes are set up. The colours assigned display in the gradebook for easy reference.
    gradescheem
  3. Click “Continue

Step 5: Managing View Display Options

  1. The number of decimals displayed. Select between 1 and 5.
    • LEARN does not erase any significant digits. You can adjust this setting on a gradebook that already has student data and the new decimal displays will be correct.
  2. Click “Continue

Step 6: Student View Display Options

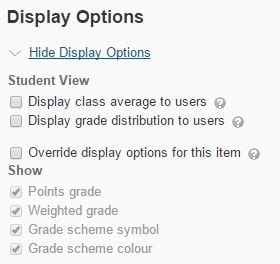
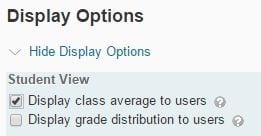
This determines only what students see and will not change the instructor’s view of the gradebook.

  1. Grade Details:
    • Points grades are the points for any individual item
    • Weighted grades are the points weighted against the course
    • Grade Scheme Symbol is the letter grade assigned in the scheme.
    • Grade Scheme Colour is the colour coding assigned in the scheme.
  2. Decimals Displayed can be anything between 1 and 5.
  3. Characters Displayed can be between 0 and 50. It is unusual for a RRC Polytech gradebook to have text items, so most people simply leave this at the default.
  4. Final Grade Calculation: This setting determines whether students can see how their final grade was calculated.
  5. Click “Continue

Step 7: Grades Setup Summary

  1. Review the settings you have applied.
  2. Click “Finished


Grade Items

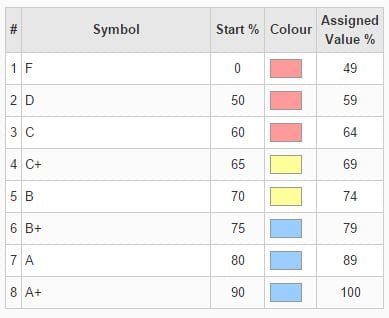
Grade items are the actual items you’re evaluating in the course – quizzes, labs, assignments, etc. Grade items can exist independently in your grade book, or you can associate them with items in tools such as discussions, quizzes, and dropbox folders, which will allow the grades to flow into the gradebook automatically. Each grade item has its own entry in the grade book. Depending on the grade item type you want to create, grade items can be graded numerically or based on a grade scheme (A+, B, C, etc).

Grade items can either be created in the gradebook or through the tool you are using to assess students (dropbox, quiz tool, etc).

Creating a Grade Item & Grade Item Settings

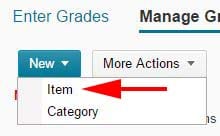
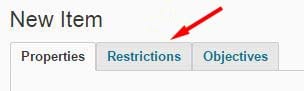
To create a grade item click “New”, and then “Item” on the Manage Grades page.
newitemgradebook

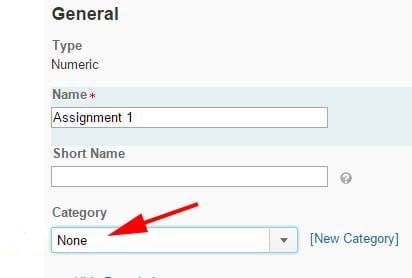
You will have to select the type of grade item you want. Typically people will use “Numeric”, but feel free to experiment with the others. Formula, Calculated, and Text are all gradebook items that do not contribute to the final grade.

For numeric grade items you will then have to select some settings:

  1. Name the grade item. Use a name you and your students will recognize.
  2. Select the Category for this grade item. For example, Assignments. This can be changed later.
    category_grade_item
  3. Create an optional Description. This could be information for yourself or a TA or EA, or by clicking the “Allow users to view description” option it can be shown to students.
  4. Specify how many points this assessment is worth, as well as the Weight. Remember the Weight is the item’s percentage of the category. If you only have one item in the category that item will be worth 100%. The weight option is greyed out if you have selected a category setting that auto calculates weight for you.
  5. Can Exceed” will allow the gradable item to exceed 100% if bonus points are given.
    canexceed_gradeitem
  6. Bonus” designates this item as Bonus Points Only. If you select this it will not contribute to the total weight of the category.
  7. Select an alternate grade scheme for this individual grade item if necessary.
  8. Optionally attach a rubric for grading. It is better to attach the rubric to the assessment itself if the assessment takes place in LEARN. (Example: attach the rubric within the dropbox assignment).
    • Note that you must create a rubric using the rubrics tool before you can attach a rubric.
  9. The “Student View” display option allows LEARN to display anonymous statistics about the grade item for students.
    displayoptions_collapseddisplayoptions_expandedclass_average_grade_distribution2
  10. Restrictions such as availability date, release conditions etc. can be applied to the individual grade items (just as they can to categories) by clicking on the Restrictions tab at the top of the page.
    restrictions_gradeitem_new
  11. When you’re done click “save and close”, “save and new”, or “save”.
    saveandclose

Categories

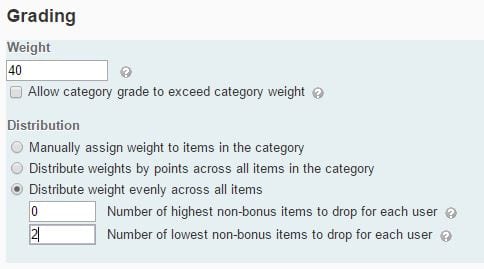
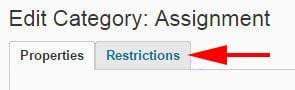
Use grade book categories to organize and group related grade items into sections. For example, you could have separate categories for Dropbox Submissions, Quizzes, Case Studies, Participation, Discussions, and so on. When grade items are grouped together in a category, you can distribute points equally across all grade items and drop the highest or lowest item in the group.

Creating Categories & Category Settings

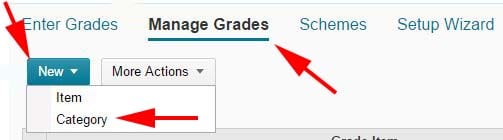
To create a category, click “Manage Grades”, then click the “New” button in the upper left corner, and then “Category”.
managegrades_new_category2

  1. Give your category a name. For example, “Assignments”.
  2. Add an optional description for the category. This could be information for yourself or a TA or EA, or by clicking the “Allow users to view description” option it can be shown to students.
  3. Set the category’s weight, which again is the percentage of the final grade that this category contributes.
    weight
  • Below Weight you can select the “Allow category grade to exceed category weight” option. This will allow the category to exceed 100% if bonus points are earned within the category. If you leave this unchecked then bonus points can still be earned within the category, but the category will not exceed 100%.
  • Distribution:  
    1. These options allow you to determine how weight is applied within the category.
    2. Manually assign weight to items in the category” allows you to give each item a unique weight (%). You will need to make sure that all of the items in the category add up to 100%.
    3. Distribute weights by points across all items in the category” will automatically adjust the weight based on the points you have assigned to each assessment.  For example, if there were 3 items in a gradebook, two worth 5 points each and one worth 10 points it would translate to two items worth 25% of the category each and one worth 50% of the category.
      • This option is recommended for new users.
    4. Distribute weight evenly across all items” sets every item in this category to be worth the same amount regardless of how many points are assigned. 1 item would be 100% of the category, 2 items would be 50% each, 3 would be 33.333% each, etc. This method of distribution also gives you the ability to drop high or low scores from the category.
      gradedistribution
    5. You can set custom Display Options by clicking Show Display Options.
      displayoptions_collapsed
      These settings display anonymous statistics abut the course for students.
      studentdisplayoptionsclass_average_grade_distribution
    6. At the top of the screen is the “Restrictions” tab.  This will allow you to hide the grade category from students so that they cannot see it, set date restrictions on viewing, or apply release conditions.
      restrictions
    7. When you are done click “save and close”, “save and new”, or “save”.

Adding Categories to your Gradebook Video:

Updated: 4/7/2016

RRC Polytech campuses are located on the lands of Anishinaabe, Ininiwak, Anishininew, Dakota, and Dené, and the National Homeland of the Red River Métis.

We recognize and honour Treaty 3 Territory Shoal Lake 40 First Nation, the source of Winnipeg’s clean drinking water. In addition, we acknowledge Treaty Territories which provide us with access to electricity we use in both our personal and professional lives.

Learn more ›