
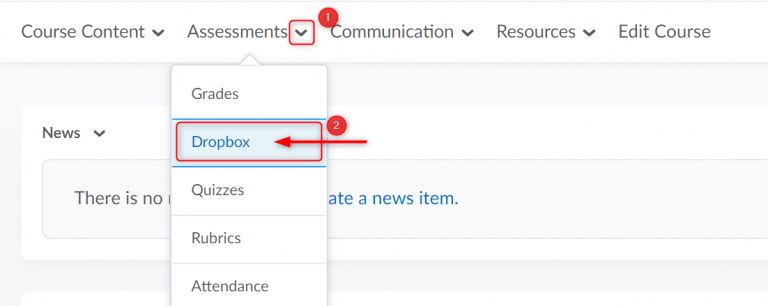
On the navbar, click Assignments and choose Dropbox.
On the Dropbox page, click New Folder.
Enter a Name (1), Instructions (2), and upload any Attachments (3), or any files, link to any existing activities or external links, attach any files from OneDrive, and record and/or upload any audio or video notes.
To make your assignment visible to learners, click on the Visibility toggle.
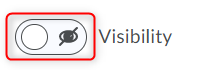
Note: If this Visibility is not turned on when creating the assignment, the assignment is hidden from learners by default.
It is always recommended to Save your work.
You can associate an assignment directly with the Grade item, allowing you to evaluate assignment submissions directly with a Gradebook.
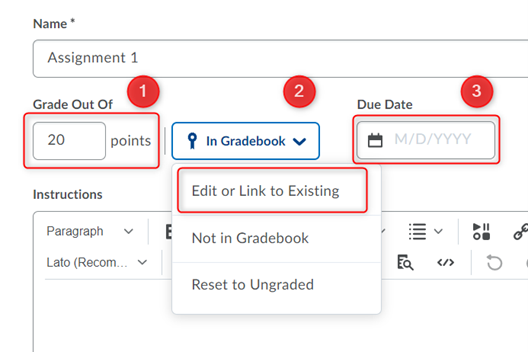
To assign a score, in the Grade Out Of field enter a value. If there’s also an associated grade item, maintain consistency by matching the value of the Out Of field to the grade item’s Max Points value.
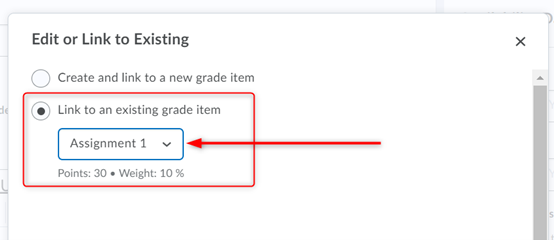
To associate the assignment with a grade item in your grade book, select an Edit or Link to Existing option, and under Link to an existing grade item choose the correct grade item.
Only numeric grade items can be associated with assignments.
Click OK.
Now, your assignment is linked to the Gradebook.
You can set up a Due date for this assignment. Please note, students will see that there’s a due date for this assignment and LEARN still will allow students to submit their assignment after the due date has been reached. Their submission will appear with a mark of late submission.
If you need to set up stricter settings, you can do that by setting dates and conditions.
Under Availability Dates and Conditions option you will be able to set up Start and End Dates, Release Conditions, and provide Special Access to some students.
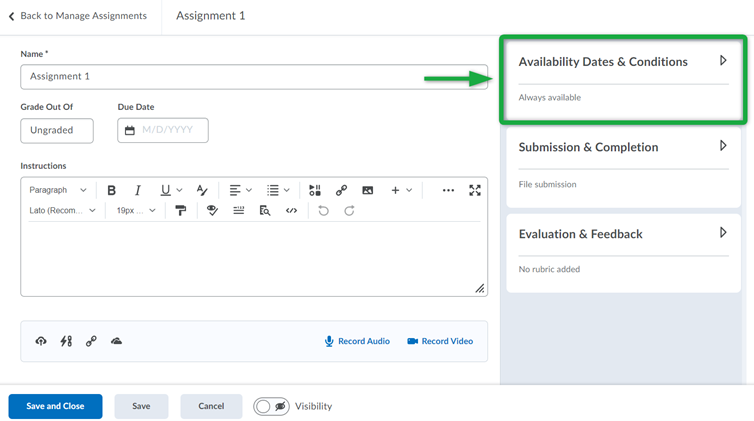
Click on the drop-down menu next to Availability Dates and Conditions:
Start and End Dates: if you want to hide this Assignment and allow the students to access it ONLY within certain dates, this option allows you to ‘Show’ and ‘Hide’ the assignment from the student’s Assignments’ list.
When you set up a ‘Start Date’, the assignment will show up and students will be able to access ONLY when the date and time are reached.
When you set up an ‘End Date’, the assignment will disappear from the students view and they will not be able to see and access the assignment anymore.
Release Conditions: Users are not able to access or view the assignment unless they meet the release conditions.
For example: Students will be able to access the assignment ONLY after they complete reading all materials of Module 1.
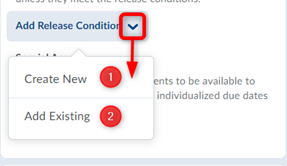
Under Release Conditions, to create and attach a new release condition to the assignment, click on the Add Release Condition dropdown menu and select Create New.
From the Condition Type dropdown menu, select the condition that must be met. From the Assignment Submission Folder dropdown menu, select the assignment submission folder, in which this condition must be met and click Create.
Under Release Conditions, to attach an existing release condition to the assignment, click on the Add Release Condition dropdown menu and select Add Existing. Select an existing release condition from the list of available release conditions and click Attach.
Note: Use the View Conditions for the drop-down menu to filter the existing release conditions.
Special Access allows assignments to be available to only a select group of users or individualized due dates for certain users.
To enable assignments to be available only to a select group of users or to add individualized due dates for certain users, click Manage Special Access.
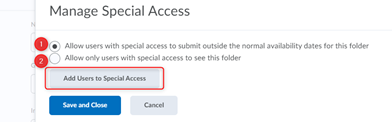
Select either the Allow users with special access to submit outside the normal availability dates for this folder radio button or the Allow only users with special access to see this folder radio button.
Click Add Users to Special Access and if applicable, specify the Due Date, the Availability start and end dates, and then select the checkbox alongside the users whom you want to grant this special access.
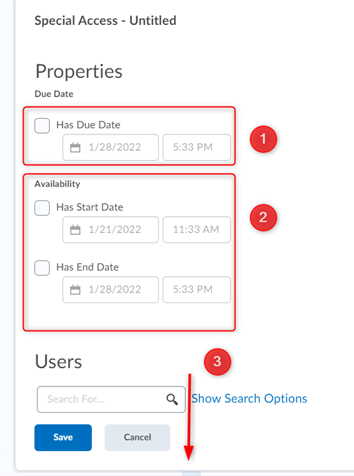
Click Save and then click Save and Close.
The special access icon, the number of users with special access, and the condition appear under Special Access. If you need to set up an additional student with a Special Access, then repeat the process.
Under the Submission and Completion option you will be able to set up Assignment Type, Submission Type, Files Allowed Per Submission, Allowable File Extensions, Submissions, and Notification Email.
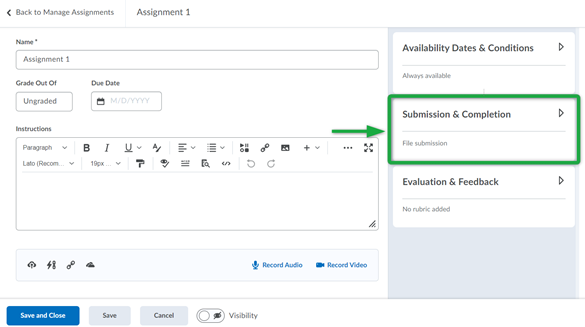
Click on the drop-down menu next to Submission and Completion:
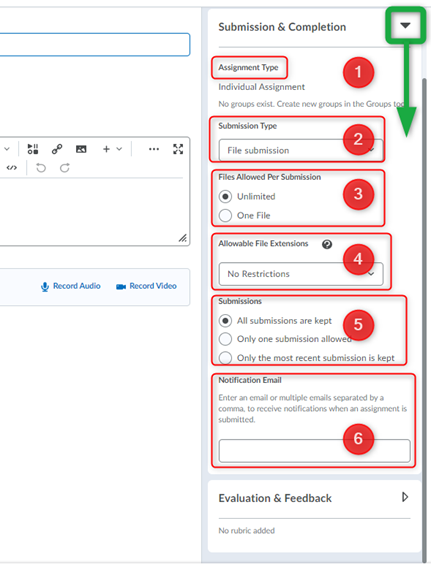
Assignment Type: Select an Assignment Type, Individual assignment, or Group assignment.
Group assignment enables you to have one submission per group, but you must associate the assignment with a Group Category. Any group member can submit and view files for a group assignment.
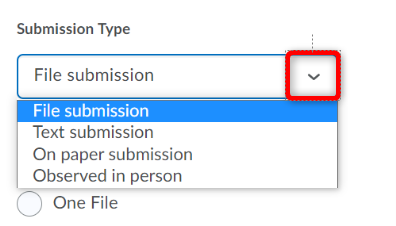
Submission Type: select from the options below how you want your students to submit the assignment.
Files Allowed Per Submission: For File submissions, set the number of Files Allowed Per Submission
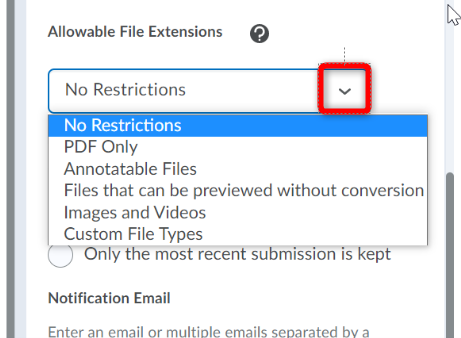
Allowable File Extensions: The Allowable File Extensions field provides options for the types of files that learners can submit for the assignment. Options in the drop down menu include:
Submissions: choose from the following options:
Notification Email: To receive email notifications when an assignment is submitted, under Notification Email, enter an email address or multiple email addresses separated by a comma.
Under Evaluation and Feedback option you will be able to set up Rubrics, Learning Objectives, Annotation Tools, and Anonymous Marking.

Click on the drop-down menu next to Submission and Completion:
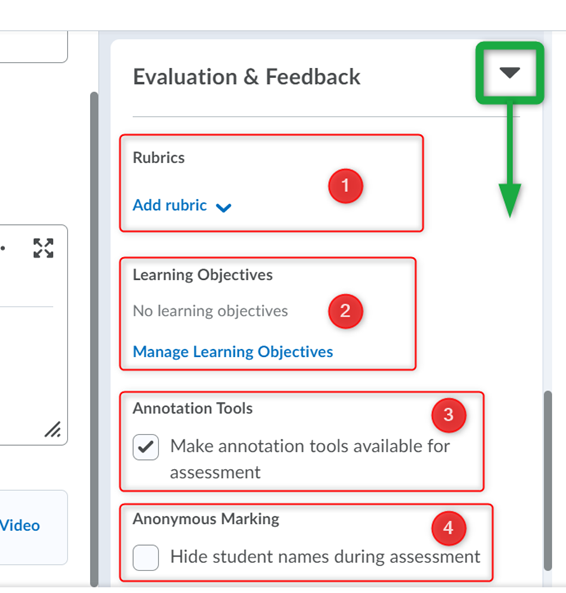
Rubrics: To associate a rubric to the assignment, click Add Rubric, or Create Rubric in New Window. For more about the rubric tool click: HERE
Learning Objectives: you can add learning Objectives for the assignment here.
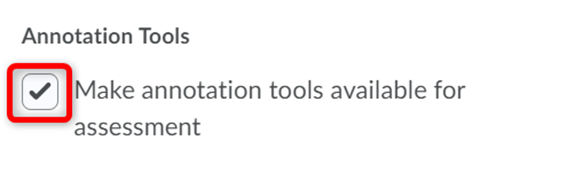
Annotation Tools: To display annotation tools in the document viewer, under Annotation Tools, select the Make annotation tools available for assessment check box.
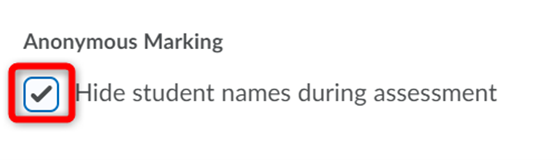
Anonymous Marking: To enable anonymous marking, under Anonymous Marking, select the Hide student names during assessment check box.
Click Save and Close.
RRC Polytech campuses are located on the lands of the Anishinaabeg, Ininiwak, Anishininwak, Dakota Oyate, and Denésuline, and the National Homeland of the Red River Métis.
We recognize and honour Treaty 3 Territory Shoal Lake 40 First Nation, the source of Winnipeg’s clean drinking water. In addition, we acknowledge Treaty Territories which provide us with access to electricity we use in both our personal and professional lives.