
Information Technology Solutions

Capture screenshots to attach to emails & Service Portal tickets

Capture screenshots using Snipping Tool

Visit Microsoft’s Use Snipping Tool to capture screenshots webpage for instructions on opening Snipping Tool on your computer and using its simple features.

Although you can use the Print Scrn button on your keyboard to take a screenshot of your entire monitor, Snipping Tool allows you to select only the information and menus that you need to capture, and then annotate, save, or share the snapshot. As well, you will avoid accidentally having personal information, or things protected by FIPPA and PHIA, being

NOTE: For best image results, save your screenshots in PNG format to the file location of your choice.

The Snipping Tool’s default format is PNG, but you can use the Save as type drop‑down menu to change the file type, if necessary.
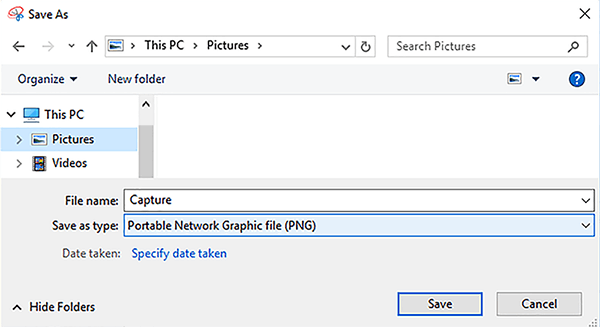
save as window


Attach screenshots to emails

Once you create your screenshots by following the instructions in the Capture screenshots using Snipping Tool section, you can insert them into an email message in one of two ways:

Add as a separate file

On the Message tab, in the Include group, click the Attach File drop‑down menu, select your image, and then click Insert.

Add into body of message

With your cursor anywhere in the body of your message, on the Insert tab, click Pictures, select your image, and then click Insert.


Attach screenshots to Service Portal tickets

Once you create your screenshots by following the instructions in the Capture screenshots using Snipping Tool section, you can either add your screenshot to a new Service Portal ticket or to an existing Service Portal ticket.

New ticket

  1. Click Service Portal to submit your new ticket.
  2. Click Browse Services in the Request a Service window.
  3. When the Service Catalog opens, click an area that would best represent your need for technical support.
  4. When that category opens, click a secondary option for that support.
  5. On that support page, read about the service provided under this topic and what happens after you submit your request.
  6. When you are ready, click the Submit Request link on the right side of the window.
  7. Enter the following information:
    • Describe the subject.
    • Provide the specific issue you are having.
    • Provide more detail about your concern in the body of the request.
    • Browse for an attachment of an error message or a file, something that is related to the concern.
    • When complete, click the Submit button.

Existing ticket

  1. Click Service Portal to access your existing ticket.
  2. On the main Service Portal page, click View My Requests in the My Tickets window.
  3. To open your ticket you may:
    • search for your ticket in the upper portion of the page.
    • scroll down to view them in the lower part of the page.
  4. Click the Title of your ticket, to open it fully.
  5. Click the Add Attachment button just below your Ticket title and Service Request ID.
  6. Browse for your file and then click Upload to add it as an attachment.

← Back to General Computer Information

RRC Polytech campuses are located on the lands of the Anishinaabeg, Ininiwak, Anishininwak, Dakota Oyate, and Denésuline, and the National Homeland of the Red River Métis.

We recognize and honour Treaty 3 Territory Shoal Lake 40 First Nation, the source of Winnipeg’s clean drinking water. In addition, we acknowledge Treaty Territories which provide us with access to electricity we use in both our personal and professional lives.